3-4 point high approach
Return to parent article: 3-4 point Josekis
The 3-4 Point One-Space High Approach is one of the most common (~45% frequency[1]) and popular 3-4 point joseki, and it is a basic move played at all skill levels. The high approach emphasizes influence rather than territory, and it allows the defender to take a large corner.
During the late 20th century, the high approach was very extremely popular among professionals and amateurs. The most common variation is a very simple. However the high approach can also lead to two of the most complicated josekis: the Magic Sword and the Avalanche (Nadare).
Popular joseki related to this position have evolved over the centuries. Some of the patterns listed in this reference are no longer considered "joseki", but the viability of unusual moves is highly sensitive to the surrounding board position. The difference in winning rate between traditional and modern joseki is often less than a point, so many old joseki are still valid and playable particularly at the amateur level.
Responses to the high approach can be classified into: taking territory, tenuki, pincers, side development, and contact play.
Quick Navigation
Moves are listed by frequency in professional games[1], which is sensitive to whole-board position. Bolded moves are commonly considered joseki today.
- a, 3-4 Point High Approach, Inside Attachment - (joseki) (AI favorite) (common) (beginner)
- b, 3-4 Point High Approach, Tenuki - (joseki) (common) (intermediate)
- c, 3-4 Point High Approach, One-Space Low Pincer - (joseki) (intermediate)
- g, 3-4 Point High Approach, Knight's Move - (joseki) (intermediate) (situational) (chinese fuseki)
- e, 3-4 Point High Approach, Outside Attachment - (joseki) (situational) (advanced)
- d, 3-4 Point High Approach, Two-Space High Pincer - (joseki) (advanced)
- f, 3-4 Point High Approach, One-Space High Pincer - (joseki) (advanced)
- l, 3-4 Point High Approach, Two-Space Low Pincer - (joseki) (experimental) (rare)
- h, 3-4 Point High Approach, One-Space Low Extension - (joseki) (antiquated)
- i, 3-4 Point High Approach, Two-Space Low Extension - (joseki) (antiquated)
- n, 3-4 Point High Approach, Two-Space High Extension - (rare)
- j, 3-4 Point High Approach, Three-Space Low Pincer - (rare)
- k, 3-4 Point High Approach, Three-Space High Pincer - (rare)
- o, 3-4 Point High Approach, Kitani Thrust - (rare)
- m, 3-4 Point High Approach, Inside Diagonal - (rare)
- z, 3-4 Point High Approach, Outside Diagonal - (rare)
Overview of 3-4 Point High Approach Joseki
Territorial Response
|
Territorial Response | |
 Inside Attachment (~60%)[1] |  Inside Diagonal (n/a)[1] |
- The inside attachment is overwhelming the most common response (~60%)[1] to the high approach and arguably the best local move in most situations. Black obtains a large and secure corner, and this move is played by strong AI programs in the early opening almost every time (~80% policy)[2]. It is difficult for Black to obtain a local result that is better than this, and current professionals have a strong preference for this territorial move. White can respond to the attachment with a hane at a (most common), or extend at b, potentially leading to an avalanche joseki.
- The inside diagonal is not considered joseki by professionals, although it is not precisely a "mistake". In fact, strong AI programs consider it to be a better move than most pincers/extensions.[2] This move transposes to the 3-4 Point Low Approach Kick joseki, which is perfectly fine for Black. However, it should be obvious that Black can obtain a bigger corner by attaching underneath, so the inside diagonal is clearly inferior to the main joseki.
Tenuki
See main article: 4-5 point 4-3 approach
Tenuki from the 3-4 point high approach transposes to 4-5 point joseki, so it is playable. However, professionals tenuki from the high approach less often than they tenuki from the low approach (~19% vs. ~48%)[1]. Part of the reason for this is that White's followups are severe. Furthermore, Black is slightly more likely to keep sente by responding to the high approach, whereas responding to a low approach can often be gote.
Pincers
|
Territorial Response | |||
 One-Space Low Pincer (~13%)[1] |  Two-Space High Pincer (~10%)[1] |  One-Space High Pincer (~3%)[1] |  Two-Space Low Pincer (<1%)[1] |
High approach pincers have fallen dramatically in popularity ever since the AI revolution, in large part because strong AI programs rarely play them. Strong AI programs recommend different moves than the traditional joseki. Current professional opinions about these pincer joseki are difficult to assess since pincers are currently uncommon in modern professional play.
- The one-space low pincer is the most common pincer, and it is often regarded by AI as the most reasonable of the four pincers on an empty board. While it has many variations, this pincer has been explored extensively by professionals, and joseki related to this position have the least uncertainty, making it the easiest for Black to dictate the final result. While Black can expect to take a local loss in territory, this move is a reliable method to switch the direction of play so that Black has stones facing the upper side. Several joseki related to this pincer are sensitive to ladders.
- The two-space high pincer was historically a popular pincer in the 20th century up until the AI revolution. It was infamous for its difficult joseki, including Fujisawa's Ogeima and the Magic Sword joseki. However, strong AI programs have re-evaluated these complex joseki, and they are not considered to be a good result for Black. These traditional joseki are largely obsolete among current professionals. Strong AI programs recommend much simpler moves that typically result in ambiguous fighting with multiple weak groups and counter-pincers, but the outcome has substantial uncertainty in the sense there is no definitive joseki. If Black's main objective is to develop a position on the top side, the low pincers might be more effective at achieving this objective.
- The one-space high pincer is a less common but severe pincer that typically leads to immediate fighting. It is typically AI's least favorite of the four pincers on an empty board, as it can be difficult for Black to attack White's approach stone effectively, and White is likely to counterattack the pincer stone. The high pincers are probably more reasonable in the context of the Kobayashi Fuseki, when Black has support on the left side.
- The two-space low pincer is an AI pincer that professionals have rarely played. The joseki surrounding the position are somewhat unclear and its current status can be considered experimental. This pincer (and the three-space low pincer) is played by AI when the top side is particularly urgent, and it is least likely to be counter-pincered. In fact, the simplest way of viewing it is as a splitting move, particularly when Black hopes to eventually play a two-space extension on the top. This move can also transpose to the low approach two-space low pincer.
Side Development
|
Side Development | |||
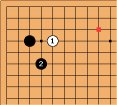 Knight's Move (~8%)[1] | 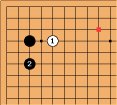 One-Space Low Extension (~2%)[1] | 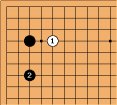 Two-Space Low Extension (~1%)[1] | 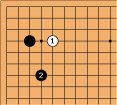 Two-Space High Extension (<1%)[1] |
- The knight's move extension is a situational attacking move that is traditionally played in the context of the chinese fuseki. Historically, it was also used as a move to develop the left side, but normally it is probably better to play the attachment underneath first as Black can anticipate to obtain the same knight's move with a much larger corner. The side extensions are generally only considered if there is a chance White may play an avalanche variation or if Black wishes to avoid strengthening White through contact play.
- The one-space low extension is functionally similar to the knight's move, and it can also be recommended by AI during the chinese fuseki. The low extension is more secure and it eliminates the weaknesses of the knight's move, meaning that Black can safely play more aggressively on the outside. However, the low extension applies slightly less pressure on the approach stone.
- The two-space extensions are rather uncommon in modern go. They emphasize development of the side, but ceding the corner to White is quite a significant loss.
Contact Play
|
Contact Play | |
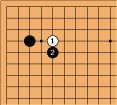 Outside Attachment (~7%)[1] | 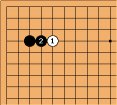 Kitani Thrust (n/a)[1] |
- The outside attachment is a situational move that is occasionally played when Black wishes to develop a moyo on the left side. It is an interesting pattern that often leaves the corner somewhat unsettled with both players building central influence.
- The kitani thrust is an unusual yet simple move that is not quite joseki, but it was often played by Kitani Minoru (9p). It is generally not well-regarded by strong AI programs, but it is worthwhile to know for historical reasons.
Discussion
When and where to pincer?
Although pincers have dropped in popularity ever since the AI revolution due to the fact that it is commonly believed that "AI does not like to pincer", this is in fact a misconception. There are a number of situations when pincers are highly desirable, and in fact they can sometimes be the top choice recommended by AI.
An example board position is illustrated in Dia 1.
Here, White opted to extend an extra time with  after the 3-3 invasion and the push of
  , (note: this is still joseki, albeit less common) and proceeded into a moyo building strategy with
  .
.
Where should Black play?
The attachment underneath at c is locally a good result for Black, but we can also see that White would gain a perfect extension from their wall. Later, Black will need to reduce the moyo, which is indeed playable -- but White seems too efficient.  at c is the AI's third choice.
Rather, the AI's top choice is to play a pincer, preferably a low pincer.
Incidentally, the two-space low pincer is the AI's top choice, which is an AI pincer that has not been extensively explored by human professionals. The simplest meaning of the two-space low pincer in this context is that it functions as a splitting move that is difficult to counter-pincer, which sets it apart from some of the other traditional pincer options. Black can even tenuki after  in order to play a two-space extension on the upper side, and the AI considers this to be an even result. The corner transposes to a 4-5 point approach with a subsequent tenuki, which is manageable for Black because White lost all their potential on the upper side of the board.
Clearly, it is a bad local result in the corner for Black (hence, one reason why two-space low pincers have traditionally not been extensively played by human professionals), but strong AI programs are more willing to think flexibly with respect to corner patterns.
Playing high approach pincers blindly may not yield a good result, but doing so with strong rationale is still entirely relevant in modern go in the age of AI.
See also:
References
- [1] Frequency statistics were obtained from
![[ext]](images/extlink.gif) Waltheri's Go Pattern Search using the full database restrained to a local search (accessed August 2021). Due to the weighting of older games in the database, the certain variations appear to be less frequent than it actually is in recent years.
Waltheri's Go Pattern Search using the full database restrained to a local search (accessed August 2021). Due to the weighting of older games in the database, the certain variations appear to be less frequent than it actually is in recent years.
- [2] AI preferences were obtained from katrain/katago (v1.9.3) on a largely empty board in several opening configurations (including the Kobayashi fuseki), focusing on the first joseki played in the game with several thousand playouts. AI recommendations are highly variable according to the software version and computer hardware, and should be taken with a grain of salt. Furthermore, many pincer joseki are not fully researched by professionals / AI, especially due to their complexity.
![[Diagram]](diagrams/42/7bb598ee9054b525491ead52972e0560.png)
![[Diagram]](diagrams/39/7acf5f59315ee6fb360ca405abe0c252.png)
![[Diagram]](diagrams/43/c31a64b329f8b0a65f8840cfa4cc330e.png)
![Sensei's Library [Welcome to Sensei's Library!]](images/stone-hello.png)