3-4 point, high approach, inside contact
Return to parent article: 3-4 point high approach
The 3-4 point high approach inside attachment is the most common response (~60%)[1] to the high approach. Joseki that branch from this position are played at all skill levels, and the attach-drawback joseki is typically one of the first joseki that beginners learn.
The inside attachment is territorial and allows Black to take a large corner. At this point, White can chose to develop influence on either the top or left sides. The hane is most common, usually the best option, and establishes a position on the top. Alternatively, White can switch the direction of play by bumping on the 4-4 point to take influence on the left side, but this is a local loss for White, and it can also potentially lead to the notoriously complicated avalanche joseki.
| Table of contents |
Quick Navigation
Moves are listed by frequency in professional games[1], which is sensitive to whole-board position. Bolded moves are commonly considered joseki.
- a, 3-4 Point High Approach, Inside Attachment, Hane - (joseki) (common) (beginner) (AI favorite)
- b, 3-4 Point High Approach, Inside Attachment, Avalanche Shape - (joseki) (intermediate)
- c, 3-4 Point High Approach, Inside Contact, Pull Back - (rare)
- d, 3-4 Point High Approach, Inside Attachment, Cut - (mistake)
Overview of 3-4 Point High Approach Inside Attachment Joseki
Default Pattern
See main article: 3-4 Point High Approach, Inside Contact, Hane
|
Hane | |
 Attach-Drawback (~80%)[1] |  Attach-Descend (<1%)[1] |
- The hane at
 is overwhelming the most common continuation (~80%)[1]. It ordinarily results in the popular attach-drawback joseki. White will normally form a base that projects influence on the top side, whereas Black takes territory in the corner along with influence towards the left side.
- The attach-descend joseki is a rare historical variation that was briefly played in the 1950's after being popularized by Kitani Minoru. It does not receive a good score by AI[3] because Black played on the second line too early in the opening, so it is less efficient. However, it can be a good move in the right situation, particularly when Black hopes to have an easier invasion of the upper side.
Avalanche Shape Patterns
See main article: Avalanche
|
Avalanche Shape | ||
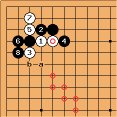 Small Avalanche (~3%)[1] | 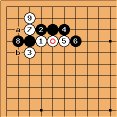 Large Avalanche (~7%)[1] | 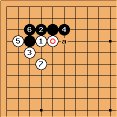 Extend-Atari (~7%)[1] |
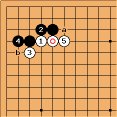 Descend Variation (~1%)[1] | 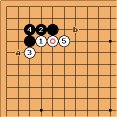 Connect Variation (~3%)[1] | 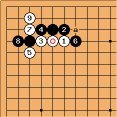 Approach-Extend (~1%)[1] |
The small and large avalanche are notoriously complicated joseki that were historically the primary way for White to change the direction of play when approaching a 3-4 point. It is somewhat difficult for White to get a good result after bumping at  , and the avalanche joseki exist in principle to punish White if they are asking for too much. Meta surrounding the avalanche joseki have fluctuated substantially through the years, and currently (August 2021) they are not very popular in professional play. That said, strong AI programs still regularly recommend avalanche variations even if they are avoided by many players.[3]
- Black's most violent response is the small avalanche at
 , which often results in fighting. According to AI, this is typically the best option for Black if there are any stones in the vicinity that could support a fight, particularly if Black has the ladder.[3] Advanced players should read out the small avalanche prior to playing
  , as it is Black's discretion to choose this joseki. There is no way to simplify the small avalanche after it is started, so it is a one-way street for White. Professionals will avoid playing the bump at
  to begin with if they judge that the small avalanche yields a bad result.
- If the fight in the small avalanche does not seem favorable or interesting, Black's next best option is to extend at
 , which is the most common variation seen in professional games. This move dares White to push with
  , which turns into a psychological game of who is more afraid of the large avalanche. Ideally, Black should hane with
  to initiate the large avalanche, which is theoretically good for Black. However, the large avalanche joseki are infamously difficult with lots of fighting, so Black might also choose to back down if they're unfamiliar with the joseki. Backing down at this point becomes a good exchange for White, so professionals nearly always prefer to play the large avalanche hane if White pushes with
  .
.
- If White is afraid of the large avalanche, the extend-atari variation with
 can be played to simplify the position. Historically, this was thought to be slightly inferior for White, since white takes gote and has a somewhat unattractive position. The AI revolution has revealed that this inferior result is probably the best that White can do in this situation, and the AI does not like to play the large avalanche as White.[3] For this reason, the large avalanche has become uncommon in modern professional games, as it is now believed that the large avalanche favors Black slightly more than White.
- The descend variation is currently the most common variation seen in amateur games, and it is typically the variation that professionals recommend to amateurs (or anyone that doesn't know the avalanche joseki). Black can keep sente if they are willing to give White a large wall, or alternatively Black can take gote to solidify the corner. In all variations, White becomes quite thick and difficult to attack, but White's wall is undercut. This variation is quite decent for Black, but professionals do not play it as often themselves. In all likelihood, it is probably slightly inferior to the extend/avalanche variations. In fact, the descend variation was known prior to the AI revolution, but it wasn't considered to be as good for Black. AI's tendency to value territory more than influence probably shifted the view on this particular variation.
- The connect variation was traditionally taught to beginners and amateurs as a method for Black to simplify the position and avoid all complications. However, it is probably Black's weakest response locally, and the descend variation typically achieves a better result while avoiding the avalanche. The solid connection is not very common among professionals these days.
- A rare but noteworthy variation is black pulling backwards with
 instead of the hane. The approach-pullback variation typically transposes to other joseki, but it is most commonly played by professionals as a technique to enter the large avalanche while avoiding any possibility of the small avalanche.
Discussion
Avalanche joseki are currently out of style (2021)
As of 2021, complicated avalanche joseki are currently out of style. Takemiya Masaki is famous for saying after the 1988 honinbo final, "I will never play nadare in my life again. I dont like large scale joseki since its complicated and it settles too much of the board. For beginners I recommend just to play the simple variation (descend variation)." Likewise, Takemiya's recommendation has stuck, and the descend variation is now the dominant variation in modern go. Although the descent was historically viewed as an inferior result for Black, the AI revolution has revealed that it is not as bad as previously thought, and professionals now play it on a regular basis.
Despite the current popularity of the descend variation, it should be noted that the avoidance of the avalanche is merely a trend. Strong AI programs often prefer other moves, and the avalanche joseki are theoretically slightly favorable for Black. It is best to view the small avalanche and large avalanche as fighting joseki can be used to punish White if the surrounding board position is favorable. However, Black does not need to punish White to feel satisfied, and Black is already reasonably content playing a simple variation.
The large avalanche is probably close to obsolete in modern go, and White rarely has a reason to ever play it. Strong AI programs seem to believe that it is best for White to play a simple variation, and White typically wants avoid the large avalanche.[3]
However, it is important to recognize that this "meta" is based upon the presumption that professionals and strong AI programs are all familiar with the optimal large avalanche joseki. It could be argued that all of this is irrelevant for an amateur player, and avalanche joseki generally favor the player with stronger reading skills or studied these joseki more extensively. Theses variations are therefore a method to start a high-stakes fight.
It is useful to study the small avalanche joseki because it is possible for Black to unilaterally force this variation, and there is no way for White to simplify the position. Learning the small avalanche can therefore be a practical skill at the intermediate/advanced levels of amateur play.
Practical notes on the small avalanche
See main article: Small Avalanche
For advanced players, the small avalanche is a worthwhile joseki to study because there are many situations when it can be an effective move. Professionals nearly always read out the small avalanche prior to playing the bump at  , as sometimes the result can be terrible for White. By corollary, recognizing the right situations to play the hane can be a useful tool to have in one's toolbox, since it can be a severe move to punish White.
In Dia 1, Black is forming a moyo in the upper right quadrant of the board. White plays the high approach  and bumps with
  to form the avalanche precursor shape. White hopes that Black will play the descent at b, as this popular joseki variation will allow White to settle easily with a group that effectively reduces the majority of Black's potential.
However, a prudent player would notice that Black has additional stones ( ) near the vicinity of the upper right quadrant. Many of the complicated avalanche joseki occupy approximately a quarter of the board, so any additional stones on the sides are likely to have dramatic effects on the joseki's favorability.
On an empty board, the small avalanche is already considered an even result for both players, and it typically leads to the mainline variation (shown below) when played conservatively. The current main variation ends with White handling two weak groups on each side, while Black has one weak group in the center. If the player imagines this variation played out on the board, we can clearly see that the small avalanche would be a disaster for White.
In fact, Black can do even better than the conservative mainline variation. If Black has any support (even only on one side), strong AI programs begin to recommend to the violent fighting variation, which is even more severe on White but far more complicated. Understanding this requires good reading skills, as the fighting variation can potentially involve side trades and pushing battles. For instance, the fighting variation is recommended when the small avalanche is played in the Chinese fuseki, since Black's extra fuseki stone on the top side will eventually function as a free yet critical move in the ensuing fight.
The last noteworthy mention is the ladder, which is a currently a minor consideration when playing the small avalanche. If White has the ladder, White has the option to play the (good) ladder variation, which gives White a slightly better position in the center if Black chooses to play conservatively with the safe capture at z (old joseki). Historically, this slight difference was significant enough that professionals would not play the small avalanche if White had the ladder. However, AI has altered this view, since strong AI prefer to fight with the turn at  instead of defending at z.[3] Consequently, one simplified interpretation is that playing the ladder variation encourages Black to fight. Nowadays, many professionals opt to play the tiger's mouth (main variation) even if White has the ladder, and Ryan Li (3p) says: "Some players like to play the extension if White has the ladder, but this is a common misconception. The tiger's mouth is almost always better."[2]
|
Common Small Avalanche Patterns | |||
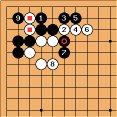 Main Variation | 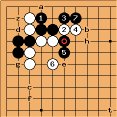 Good Ladder | 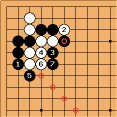 Bad Ladder | 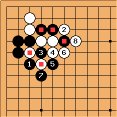 Old Joseki (Bad) |
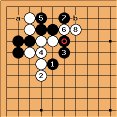 Fighting Variation | 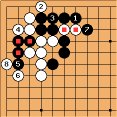 Side Trade | 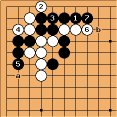 Pushing Battle | 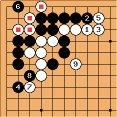 Corner Death |
References
- [1] Frequency statistics were obtained from
![[ext]](images/extlink.gif) Waltheri's Go Pattern Search using the full database restrained to a local search (accessed August 2021).
Waltheri's Go Pattern Search using the full database restrained to a local search (accessed August 2021).
- [2] (Youtube) Ryan Li (3p):
![[ext]](images/extlink.gif) 10 Outdated Go Joseki and Why (Part 2 of 2) (2020)
10 Outdated Go Joseki and Why (Part 2 of 2) (2020)
- [3] AI preferences were examined using Katago (v1.8.0 30 blocks) with at least five thousand playouts in a wide variety of board positions, including common fuseki and positions reproduced from professional games. AI preferences can vary wildly based on the software version, optimization parameters, and computer hardware, so these recommendations are likely to change in the future.
![[Diagram]](diagrams/12/451bb6772dd5ba471609c8389d4ad18f.png)
![[Diagram]](diagrams/40/3331c8566ea471cdf15b08d963f1de91.png)
![Sensei's Library [Welcome to Sensei's Library!]](images/stone-hello.png)