4-4 point 3-3 invasion joseki
Return to parent joseki article: 4-4 point Josekis
The 4-4 Point 3-3 invasion is a common and popular joseki ever since the AI revolution. It is a basic move that is played at all skill levels, and it emphasizes territory at the expense of influence. The 3-3 point is the vital point of the corner, and it is easy for the invader to live underneath with a corner territory worth ~10 points.
Some go teachers discourage beginners from invading immediately. Prior to 2016, the early 3-3 invasion was considered a bad move, since the defender was believed to gain more influence on the outside than the tangible value of the corner. However, strong AI programs disagree and have revealed new joseki that make the early 3-3 invasion more favorable. Furthermore, strong AI programs have a territorial playing style that complements strong invasion and reduction skills in the middle game.
For a first view of this joseki, see 3-3 Point Invasion. Players for whom this discussion goes too deep are advised to read that discussion instead. An overview of SL pages about the 3-3 point invasion is given on All About 33 Point Invasion.
| Table of contents |
Quick Navigation
Moves are listed by frequency in professional games[1], which is sensitive to whole-board position. Bolded moves are commonly considered joseki.
- c, 4-4 Point 3-3 Invasion, Extend - (joseki) (common) (beginner) (AI favorite)
- b, 4-4 Point 3-3 Invasion, Hane - (joseki) (common) (beginner) (AI favorite)
- a, 4-4 Point 3-3 Invasion, Knight's Move - (joseki) (common) (intermediate) (AI favorite)
- d, 4-4 Point 3-3 Invasion, Hane Below - (rare/situational)
- e, 4-4 Point 3-3 Invasion, Armpit Hit - (rare/situational)
Overview of Common Joseki
Common Sente Variations
|
Sente Variations | |||
 Extend, Small Knight (~15%)[1] |  Extend, Jump (~5%)[1] |  Extend, Push (~4%)[1] |  Small Knight, Bump (~22%)[1] |
- Modern go since the AI revolution typically emphasizes sente. Black will nearly always play for sente in the early opening, and it is normal to leave 3-3 invasion joseki locally unsettled. The three-stone hane shape is a recurring pattern, and it is extremely common to tenuki at the earliest opportunity.
- Extending with
 is the simplest way for Black take sente. It is failsafe, well-regarded by AI, and avoids any complications, so it is especially popular among amateurs. However, it applies less pressure on White's invasion and has weaker follow-ups, so it is probably locally inferior compared to the small knight's move. That said, the three-stone wall is more stable and has fewer weaknesses, so Black may prefer this variation if they think White will ultimately come back and get the first move in the corner later.
- The knight's move with
 usually results in the three-stone hane shape, which is locally a better variation for Black than the simple extension. The knight's move typically ends with Black in sente, but there are ways for White to resist, complicate the position, or fight to take away sente. It can potentially lead to the notoriously difficult flying knife joseki. Professionals and strong AI programs usually prefer the knight's move unless sente is extremely urgent. The three-stone hane shape has slightly better follow-ups for Black, but this position is more unstable and Black would ultimately like to get the first move in the corner later.
Territorial Variation
|
Territorial Variation |
 Double Hane (~19%)[1] |
- The double hane variation is played when Black wishes to keep their corner territory in gote. White obtains a ponnuki on the outside, sente, as well as invasion aji on the top side of the board. This is considered an even result for both players in the early opening, and it is well-regarded by strong AI programs. There are many situations when the double hane can be a good move for Black, and it is ideal when the left side of the board is not interesting for both players. It is also the easiest way for Black to settle with solid territory when Black does not have potential to develop on either side.
Common Wall Variations
|
Wall Variations | |||
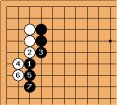 Three-Stone Wall (~4%)[1] | 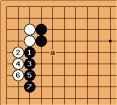 Two-Stone Wall (~2%)[1] | 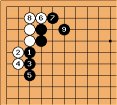 Bad Exchange (~3%)[1] | 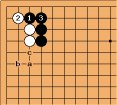 Hane Below (~1%)[1] |
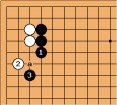 Small Knight f/u (~2%)[1] | 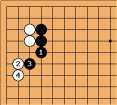 Attach-Extend f/u (~2%)[1] | 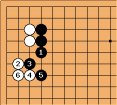 Attach-Hane f/u (~1%)[1] | 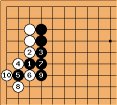 Double-Hane f/u (~2%)[1] |
- Historically, it was common and intuitive for Black to make a wall during the 3-3 invasion. The hane at the head of two stones is the traditional joseki, and Black takes gote. This joseki was previously believed to be favorable for Black, but the AI revolution revealed a novel way for White to play. The traditional hane/tiger mouth with
 -
- is a bad exchange that makes Black too thick. Instead, AI thinks White should push one more time at
  to guarantee life and then tenuki. Black's wall is not strong and can be attacked in the future. As a result, most professionals and strong players no longer play the traditional two-stone hane-extend joseki.
- The modern variant of this traditional wall joseki is to extend after the hane at the head of three stones. The continuation is gote, so Black often does not play this immediately. The three stone wall is a stronger shape and has less weaknesses than the two stone wall, and it is far less likely to come under attack. Although making a wall in gote might seem dull and unexciting, this type of solid play is surprisingly common among professionals, and it prevents White from getting the valuable atari-descend follow-up.
- The sente extend joseki is slightly less effective at making walls than the knight's move joseki. When Black choses to play the sente joseki, Black normally accepts that White will be able to move out on the left side. Although Black can jump ahead with the small knight at
 , there is a cutting point at a which can potentially lead to a fight.
- There are also techniques to build walls in sente. These moves are typically kikashi exchanges that Black utilizes to build strength in order to attack something on the top side. Locally, leaning like this come at a loss for Black, since White is able to gain access to the left side for free, but Black hopes to profit by attacking on the top side.
- The hane below is a situational move that Black can play when the left side of the board is not interesting for either player. Otherwise, it is not good to allow White to escape easily to the left side.
Common Side Switch Variations
|
Side Switch Variations | ||
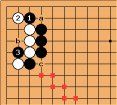 Hane-Cut f/u (~6%)[1] | 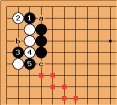 Hane-Cut f/u (~1%)[1] | 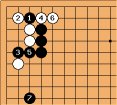 Hane-Cut f/u (~1%)[1] |
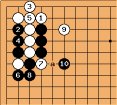 Squeeze Var. (~4%)[1] | 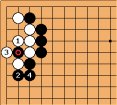 Sealed Var. (~1%)[1] | 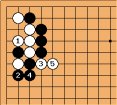 Fighting Var. (~1%)[1] |
- Both the extend joseki and the knight's move have the capacity to switch the direction of play to the opposite side in gote. This flexible feature of modern 3-3 invasion joseki frequently appears in high level games, and it is common for Black to take the opposite side of direction they originally blocked on. For this reason, it is considered okay for Black to block the initial 3-3 invasion in any direction. The hane with
 is the most popular continuation of the three-stone hane shape, and Black can pick between developing the top and left sides.
- Many of the side-switch variations are sensitive to ladders. If Black does not have the ladder, switching sides is an even result. If Black has the ladder, switching sides is more favorable for Black, and Black can get an especially thick position on the outside.
- It is also possible for White to resist and start a fight when Black attempts to switch sides.
Common Fighting Variations
|
Fighting Variations | |||
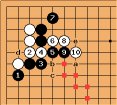 Flying Knife (Inside) (~3%)[1] | 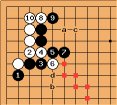 Flying Knife (Outside) (~1%)[1] | 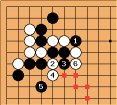 Bad Ladder (n/a)[1] | 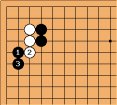 Armpit Hit (n/a)[1] |
- The knight's move can potentially lead to the notoriously complicated flying knife joseki, which is one of the most difficult joseki currently played by professionals. Both players have the opportunity to avoid this fighting joseki, but the submissive player takes a slight local loss. Most professionals will opt to fight instead of backing down.
- White requires a favorable ladder in order to play the flying knife. The position completely collapses if White lacks the ladder.
- The most common versions of the flying knife typically end with White influence towards the top side of the board and Black influence towards the left side of the board. The corner can be a seki, but sometimes one player will opt to capture the corner in exchange for a loss in outside influence.
- The armpit hit is an extremely rare fighting move that can be played when Black is thick on the outside. It aims to take away White's eye space and chase them into the center. This move has rarely been played by professionals, so it is probably not considered joseki.
Discussion
When to play the 3-3 invasion?
In traditional go theory, the 3-3 invasion was not popular since it was considered to yield an inferior result for the invader. Historically, it would occur most often in the late opening. Amateurs would often play it in the late endgame, in which case it would be used as a speculative invasion.
The traditional textbook situation to perform a 3-3 invasion was when one player obtained a double wing formation.
In Lee Sedol vs. Kang Dongyun (9p) (2009), Black obtained a double wing formation ( ), which makes it difficult for White to approach the bottom right corner from the outside. The
  stones serve as loose pincers, and they prevent White from developing anything large on either side. Since the sides are not interesting, it makes sense for White to take territory with the 3-3 invasion (
 ), and Black blocks on the larger side (
 ) to form a large moyo.
In traditional theory, this outcome was considered acceptable for White because one of Black's double wing formation stones ( ) became inefficient. The
  stone on the bottom side is in an odd position, and it is not working together with the rest of Black's stones. For this reason, invading the 3-3 was considered proper if Black has a double wing formation. Furthermore, White has sente, which means White has the momentum to play a reduction later. That said, traditional theory would dictate that White should prevent Black from making a double wing formation in the first place.
In 2016, the AI revolution dramatically changed the way that humans view the 3-3 invasion. Strong AI programs often play the 3-3 invasion as one of the first moves in the opening (see: Leela Zero's Opening Gospel), and it is clear that AI considers the 3-3 invasion as one of the most valuable opening moves in the game. Strong AI programs have a territorial playing style, and they have an easy time reducing and invading moyos. For this reason, AI typically considers influence to be less valuable than humans do.
Many professionals and human players do not have predilection for making small territories and subsequently invading opponent's moyos, so humans generally invade at 3-3 point less often than computers do. That said, the 3-3 invasion has now become a basic move in the repertoire of human players, and it is considered a valid move in the early opening at all levels of play. Players should study new 3-3 invasion joseki, and the early 3-3 invasion can quickly favor one player more than the other if the players are not aware of the flaws of the traditional joseki.
Which way to block?
The general rule of thumb is to block on the wider side (i.e. the side with the most potential).
However, this is just an heuristic, and it's not quite a mistake to block on the "wrong" side, particularly since AI joseki often allow the defender to switch sides later if the situation calls for it. Furthermore, the double-hane joseki may have different considerations for which direction to block. Ultimately, the player should block in the direction that supports the joseki that they intend to play.
When to take sente? Knight's move or extend?
In the AI era, the defender of a 3-3 invasion should generally play for sente by default. The extend (b) and knight's move (a) usually end in sente, so they are typically the main choices. Which one should White play if they both result in sente?
The extend (b) is often preferred by amateurs because it is simple and avoids all complications.
The knight's move (a) is locally a stronger move, but it can potentially lead to complications if Black attempts to resist. The infamous flying knife joseki can arise from the knight's move if Black has the ladder, so many amateurs avoid the knight's move. However, professionals and strong AI programs slightly prefer the knight's move by default.
If we examine the board in Lian Xiao vs. Chen Zijian (2020), should White extend or play the knight's move?
For professionals, the main consideration when choosing between the extend and the knight's move is the likelihood that the defender will get the next local follow-up in the corner. The three-stone hane shape that arises from the knight's move is more unstable, and the defender would like to come back to play the continuation first. Even if White opts to temporarily tenuki, White should calculate whether they will later be able to return to the corner first. In professional games, White gets the first follow-up move 64% of the time[1], indicating that the follow-up is valuable.
In contrast, when White plays the simple extend and Black slides with a small knight, the local follow-up is not as interesting for White, and the local shape is stable. Often, White will not come back to play in this corner again, and Black will eventually come back to get the first local follow-up move ~50% of the time[1].
A simple heuristic for understanding this is that if White owes an urgent move elsewhere on the board, White should extend so that White can address that urgent place on the board (usually in gote). That way, when it is Black's turn, Black does not have an interesting follow-up on the corner.
Considering the board position in Lian Xiao vs. Chen Zijian (2020), White does not owe any moves and nothing stands out as particularly interesting. Since there is nothing interesting on the board, the knight's move at a is the choice preferred by professionals and strong AI programs. In fact, the top left corner is the most interesting area of the board, and White immediately plays the follow-up hane at e after forming the three-stone hane shape.
Summary: The follow-ups to the three-stone hane shape are big moves. Ideally, White should not to make the three-stone hane shape if White thinks there is a high chance that Black will play the follow-up first.
When to double hane?
The double-hane joseki is considered an even result on an empty board, but there are many situations when it can become an especially favorable joseki for the defender.
In Fan Yunruo vs. Chen Yaoye (2020), Black has a low position on the upper left ( ), which makes the upper side of the board uninteresting for White. This area is not easily developable by either player, so it has fairly low value.
The double hane with  is favorable for Black because White's ponnuki will not be very useful. The ponnuki is a strong group that projects powerful influence (see: A ponnuki is worth thirty points), but Black already has a group on the top side that neutralizes the value of the influence. Meanwhile, Black managed to take back all of the corner territory, so White's profit is limited.
Identifying good situations to utilize the double hane is a valuable skill. Although this variation is rarely played as the first joseki in the game, it can be a good way to respond a delayed 3-3 invasion when more the board has been explored, and it is frequently used as a strategy to overconcentrate one's opponent.
When to play the hane below?
The hane below is a fairly rare move that is not seen in most joseki dictionary, but it is still played by professionals in fairly unique situations.
According to josekipedia, "When black has no real profit to gain at top, e.g if white is really strong around (on the top), he can play like this, building a solid wall without weakness. It can also be played if black has a close double wing formation, where black can stop whites expansion."
Cho Chikun vs. An Kwanwuk (2018) illustrates the latter case, where Black already had an existing set of stones ( ) that block White's expansion. Ordinarily, allowing White to escape along the side is a mistake, but Black utilizes his surrounding strength to launch an effective attack on White's invasion.
It is noteworthy to mention that Black blocks with  on the bottom side. Blocking in the other direction would cause Black to be overconcentrated with two narrow walls, which is very unattractive. Playing in this way allows Black to gain strength to launch a second attack on White's stones on the right side, and Black can maintain momentum by staying on the offensive.
Tenuki is bad
Normally Black should not play tenuki at this point, since allowing  is very painful.
See Also
- 3-3 Point Invasion An introductory article for beginners
- All about 3-3 Point Invasion An index to the articles on specific 3-3 invasion joseki, their variations and to various queries about them, ee.g:
- (Youtube) Ryan Li (3p):
![[ext]](images/extlink.gif) Common 3-3 Invasion Joseki (2019)
Common 3-3 Invasion Joseki (2019)
References
- [1] Frequency statistics were obtained from
![[ext]](images/extlink.gif) Waltheri's Go Pattern Search using the full database restrained to a local search (accessed September 2021).
Waltheri's Go Pattern Search using the full database restrained to a local search (accessed September 2021).
![[Diagram]](diagrams/48/3c219412802046d408bc8139a87ce139.png)
![[Diagram]](diagrams/27/d4ee8d7f43927606f1f86b8348d4f580.png)
![[Diagram]](diagrams/38/629abeacbc8b030591cba250a4db535c.png)
![[Diagram]](diagrams/39/efc6c7cd4c5e210d150eaf9c8403d8ab.png)
![[Diagram]](diagrams/46/09f227b36ad7b81a3981dfffece315fb.png)
![[Diagram]](diagrams/8/dbc6dca6748f78e65f02380d1321452e.png)
![Sensei's Library [Welcome to Sensei's Library!]](images/stone-hello.png)