4-4 point 3-3 invasion, jumping away
Return to parent joseki article: 4-4 point 3-3 invasion joseki
The 4-4 Point 3-3 Invasion Small Knight is a relatively modern move, which became quite popular from the late 1980s onward. It is the most severe move that the defender can play in response to the 3-3 invasion, and it is often the top choice of professionals and strong AI programs on an empty board, even more so when the defender possesses the ladder.
Due to the possibility of entering the flying knife joseki, the presence of multiple ladders is a consideration when playing the small knight. There are opportunities for either player to simplify the position in order to avoid the flying knife at a slight local loss. This factor introduces a psychological factor in playing the small knight -- the player who is less afraid of the flying knife joseki (or fighting in general) can obtain a small local advantage.
At an amateur level, a few percentage points in winning rate is unlikely to make a significant difference on the overall game. For this reason, amateurs should not hesitate to play simplified variations. This article will aim to highlight the main simplifications of complicated joseki wherever appropriate.
| Table of contents |
Quick Navigation
Moves are listed by frequency in professional games[1], which is sensitive to whole-board position. Bolded moves are commonly considered joseki.
- a, 4-4 Point 3-3 Invasion, Small Knight, Bump - (joseki) (common) (beginner) (AI favorite)
- b, 4-4 Point 3-3 Invasion, Small Knight, Attach - (joseki) (advanced) (requires ladder) (flying knife joseki) (AI favorite)
Overview of Joseki
Safe Play: Bump
See main article: 4-4 Point 3-3 Invasion 3 Stone Hane
The bump with  is the simplest and most common response (~62% frequency) [1]. It avoids any complications related to the flying knife joseki, and in fact it is possibly the only option when White lacks the ladder.
The  -
- exchange results in the three-stone hane shape, which is a common position seen in several 3-3 invasion joseki. In the early opening, Black will often tenuki, but the first player to return to the corner can obtain significant local profit. Since Black has sente, it is Black's privilege to obtain the first move, so the three-stone hane is slightly favorable for Black.
In particular, the  hane at a is extremely big. It either seals White in the corner on both sides or destroys most of White's corner territory.
Aggressive Play: Attachment (Black Submits)
| Attachment (~42%) | ||
| Extend (~15%) | Diagonal (~3%) | |
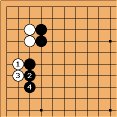 Extend (~15%)[1] | 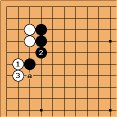 Diagonal, Extend (~1%)[1] | 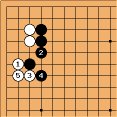 Diagonal, Hane (~1%)[1] |
- At the amateur level of play, the attach with
 is a psychological move that fights for sente and probes Black's willingness (or aversion) to enter the flying knife joseki. If Black is afraid of the flying knife joseki, Black can avoid all possibility of entering the flying knife joseki by choosing submissive variation. The "submissive" variations are slightly inferior compared to the hane (from a professional's perspective), but they are perfectly fine at the amateur level of play. Rather than calling these submissive variations "good" or "bad", it is realistically more of a matter of black's willingness to enter a large half-board fight over less than a point difference in winning rate.
- Extending with
 is the most common submissive response. Black creates a wall in gote that is roughly equivalent to the wall-building continuations from the three-stone hane shape. This is a marginally inferior result for Black because White forced Black to play a gote continuation when it may not necessarily be the most sensible choice on the board.
- Black can diagonal with
 , which transposes to common continuation of the simple 3-3 invasion joseki. Black may play this way if it doesn't make sense for Black to build a wall towards the top side, or if sente is extremely urgent. This result is slightly inferior for Black because it is inappropriate use of kikashi (a forcing move). In the regular joseki, it is best for Black to play this way if the three-stone wall is under attack and Black needs to strengthen themselves. For this reason, professionals tend to choose this variation less often than the extend.
Aggressive Play: Attachment (Black Fights)
| Attachment (~42%) | ||
| Hane (~15%) | ||
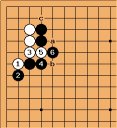 Push and Cut (~13%)[1] | 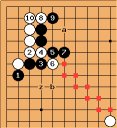 Outside Cut (~4%)[1] | 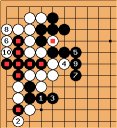 Outside Cut (Var. A) (<1%)[1] |
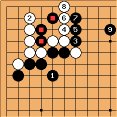
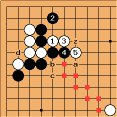 Inside Cut (~9%)[1] | 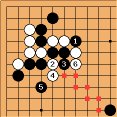 Bad Ladder (n/a) | 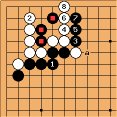 Simple Connect (~2%)[1] |
 Hanging Connect (~2%)[1] | 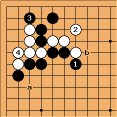 Flying Knife (Start) (~4%)[1] | 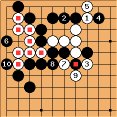 Flying Knife (Var. A) (<1%)[1] |
- If Black is willing to fight, the hane with
 is locally the strongest response. It is typically the top choice of professionals and strong AI programs, but Black should (A) feel more confident about their reading ability than their opponent and/or (B) be familiar with the principles of the flying knife joseki. Frankly, there are dozens of possible variations and branching points, and the flying knife joseki is still under active research by professionals and strong AI programs. It is probably not possible to point to a single consensus "joseki"; the "main" textbook variation (Dia 8) is played in professional games less than 1% of the time. It is probably advisable for amateurs to treat the position as a battle of overall reading ability rather than brute-force memorization.
- After the hane with
 , the
, the  -
- sequence sets up a fight. White's first decision is to choose between the inside cut with a or the outside cut with b (Dia 1). The hane at c typically transposes to the outside cut.
- White absolutely requires the ladder (Dia 5) in order to play either cut. Without the ladder, it is a disaster for White and the position completely collapses.
- We discuss the outside cut first (Dia 2) because it is simpler (relatively speaking) and transposes to an older variation of the high approach outside contact joseki. The outside cut is probably inferior for White in most circumstances, but the fighting is straightforward compared to the inside cut. If Black protects the upper group at a, White's strongest response is to attack the left group at z. This variation can be complicated, but with optimal play White can capture Black's left group (Dia 3). Although it looks like White captured a lot, the AI favors this board position for Black, as Black's influence towards the top side and center is very strong, and Black has sente.
- The inside cut (Dia 4) throws down the gauntlet for the flying knife joseki. It is typically the strongest option for White on an empty board. After the hane at
 , Black can either accept the challenge with a or submit with a simpler variation (b or c) for a local loss in territory. The simple variations (Dia 6 and Dia 7) are similar, in that Black sacrifices three stones for influence on the outside. Notably, White has a crucial cutting stone, which is a thorn in Black's wall.
- The counter-hane (Dia 8) initiates the flying knife joseki and is typically the strongest resistance by Black. The flying knife joseki has dozens of variations and possible branching points, most of which involve a capturing race between the two inside groups (which may in fact result in a seki). Importantly, the objective of the joseki is not to capture the opponent, but rather make constant whole-board judgement calls about the value of territory and influence. While it may seem counter-intuitive, the player that loses the capturing race can end up with a better position.
- This principle is illustrated in a recent "textbook" (c. 2021) variation depicted in Dia 9. In this variation, although Black has captured White's group, White has obtained sente and a ponnuki in the center of the board. Professionals and strong AI programs think White is better in this board position, which reflects the go proverb that a ponnuki is worth thirty points. It is important to remember that this was originally Black's corner, so White is not losing too much by sacrificing corner stones for the central ponnuki and wall.
Getting Cold Feet: Attach-Pullback
| Attach-Hane (~15%) | |||
| Pull Back (~1%) | |||
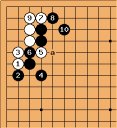 Pull Back (~1%)[1] | |||
- If White forgot to read the ladder or is unwilling to risk playing the flying knife joseki, they can back out of situation by pulling back with
 . Locally, this is slightly inferior result for White, but it is still playable.
Discussion
How bad is it to avoid the flying knife joseki?
| Estimated Score (note: colors inverted) | |||||
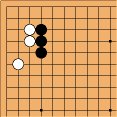 Simple Joseki B+0.1 / B+0.2 ΔB-0.2 / ΔB+0.0 | 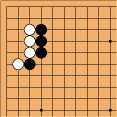 Three-Stone Hane B+0.3 / B+0.2 ΔB+0.0 / ΔB+0.0 | 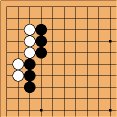 Three-Stone Wall W+0.0 / B+0.1 ΔB-0.3 / ΔB-0.1 |  Attach/Extend B+0.0 / B+0.1 ΔB-0.3 / ΔB-0.1 |  Contact/Extend W+0.1 / B+0.0 ΔB-0.4 / ΔB-0.2 |  Contact/Hane B+0.0 / B+0.0 ΔB-0.3 / ΔB-0.2 |
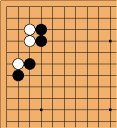 Attach/Hane B+0.9 / B+1.0 ΔB+0.6 / ΔB+0.8 |  Cold Feet B+1.0 / B+1.0 ΔB+0.7 / ΔB+0.8 |  Push and Cut B+0.9 / B+0.9 ΔB+0.6 / ΔB+0.7 | 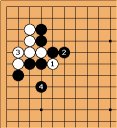 Simple Outside Cut B+0.9 / B+0.9 ΔB+0.6 / ΔB+0.7 |  Outside Cut (Part) B+0.9 / B+1.0 ΔB+0.6 / ΔB+0.8 |  Outside Cut (Full) B+1.1 / B+0.4 ΔB+0.8 / ΔB+0.2 |
 Inside Cut (Start) B+0.7 / B+0.9 ΔB+0.4 / ΔB+0.7 |  Simple Inside (A) B+0.0 / B+0.3 ΔB-0.3 / ΔB+0.1 |  Simple Inside (B) B+0.3 / B+0.5 ΔB+0.0 / ΔB+0.3 |  Inside Cut (Part) B+1.0 / B+0.2 ΔB+0.7 / ΔB+0.0 |  Inside Cut (Full) W+1.9 / W+0.5 ΔB-2.2 / ΔB-0.7 | |
yuzukitea: Amateur players shouldn't hesitate to avoid the flying knife joseki if they don't want to play it.
To demonstrate this, here is a mini-research project using AI (katrain 1.11.2 / circa 2022 / 3000 playouts / 6.5 komi). We are looking at the estimated score of final board positions of various "inferior" variations. I've set up a parallel fuseki and played a 3-3 invasion as the first move of the game and tested it both directions.
Here are the general observations based on the AI's estimated score on an empty board:
- From an amateur's perspective, Black does not lose anything significant by avoiding the Attach/Hane. The Attach/Extend variation, for instance, loses only ~0.2 points.
- The Attach/Hane is a strong move for Black (gains ~0.7 points). The estimated score stays the same if White chooses any peaceful/calm variation. White can contest the Attach/Hane by pursuing the flying knife joseki. Although it is very risky, White has the potential to gain a few points if the flying knife is played successfully. However, this is very sensitive to the overall board position and the uncertainty is high.
- If Black plays a common simplification to the flying knife joseki, the estimated score is even again.
Conclusion: At most, it costs ~1 point for either player to avoid the flying knife joseki.
See also
-
![[ext]](images/extlink.gif) This video by Yeonwoo.
This video by Yeonwoo.
References
- [1] Frequency statistics were obtained from
![[ext]](images/extlink.gif) Waltheri's Go Pattern Search using the full database restrained to a local search (accessed July 2022).
Waltheri's Go Pattern Search using the full database restrained to a local search (accessed July 2022).
- (Youtube) Ryan Li (1p):
![[ext]](images/extlink.gif) Common 3-3 Invasion Joseki
Common 3-3 Invasion Joseki
- (Youtube) Cho Hye-Yeon (9p):
![[ext]](images/extlink.gif) Malaysia + Korea The Basuk Session 1: The latest AI opening
Malaysia + Korea The Basuk Session 1: The latest AI opening
![[Diagram]](diagrams/40/aefef04d48a9ef5a658f2cbcf410c19a.png)
![[Diagram]](diagrams/18/3e552a7b2f5e2a23a258a99b911eb36a.png)
![Sensei's Library [Welcome to Sensei's Library!]](images/stone-hello.png)