4-4 Point 3-3 Invasion, Hane
Return to parent joseki article: 4-4 point 3-3 invasion joseki
The 4-4 Point 3-3 invasion, hane is a common move that is a feature of the traditional 3-3 invasion joseki as well as double-hane joseki. It can be used to create a wall or to take territory by capturing the corner in gote.
Historically, it was the most common way to play the 3-3 invasion. However, ever since the AI era, the traditional joseki has come under scrutiny for various weaknesses. Currently, professionals and strong AI programs mainly play this move if they plan take the corner with the double-hane variation.
| Table of contents |
Quick Navigation
Moves are listed by frequency in professional games[1], which is sensitive to whole-board position. Bolded moves are commonly considered joseki.
- a, 4-4 Point 3-3 Invasion, Double-Hane - (joseki) (common) (intermediate) (AI favorite)
- b, 4-4 Point 3-3 Invasion, Hane-Extend - (joseki) (traditional) (beginner)
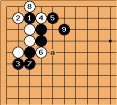
- c, 4-4 Point 3-3 Invasion, Hane, Inside Hane - (rare) (situational)
- s, 4-4 Point 3-3 Invasion, Hane-Cut - (rare) (trick play) (requires ladder)
Overview of Joseki
Take back the corner territory
|
Double-Hane (~63%) | |
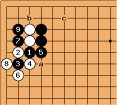 Main Variation (~44%)[1] | 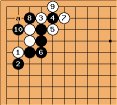 Alternate Ponnuki (~9%)[1] |
- The double hane with
 can be played if black wishes to take back the corner territory (Diagram 1). In exchange, White obtains a ponnuki, sente, and Black's position has bad aji. Historically, it was believed to be a slight local loss for Black, but after the AI revolution, the outcome is considered even for both players when played in the early opening. The double hane can be an especially effective move when the left side of the board is small, or if it forces White into an overconcentrated position.
- Traditionally, it was possible for White to obtain a ponnuki facing the opposite direction (Diagram 2). However, doing so is considered a major loss for White by strong AI programs, in large part because Black's position is considerably more thick and lacks aji.
Create a wall
| Extend (~31%) | Double-Hane | ||
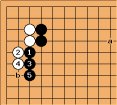 Minimal Wall (~4%)[1] | 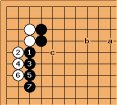 Wall +1 Push (~9%)[1] | 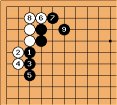 Traditional Joseki (~16%)[1] | 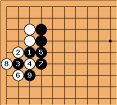 Ko Variation (~7%)[1] |
- Historically, it was common to create a wall after the hane at the head of two stones. The traditional 3-3 invasion joseki includes the
 hane (Diagram 3), but this makes Black too thick and is virtually not seen in the AI era. Contemporary professionals and strong AI programs prefer to omit the
  -
- exchange.
- It is possible to tenuki after
 (Diagram 1), which is a minimal living wall. However, if White plans to attack Black's wall, it is necessary to crawl one more time (Diagram 2) so that Black does not have any sente moves against the corner. This is the modern variation recommended in the AI era. If White plays a splitting move on the top side, later the peep is very effective.
- Historically, it was also possible for Black to create thickness in sente by threatening a ko after the double hane (Diagram 4). However, this move is no longer seen after the AI revolution because White generally will not allow Black to end with sente, even if it leaves a ko unresolved.
Attempt to seal both sides
|
Inside-Hane (~5%) | ||
 Variation A (~2%)[1] |  Variation B (~2%)[1] | 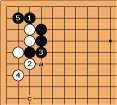 Resistance (~1%)[1] |
|
Hane-Cut (~1%) | ||||
 Sealed In | 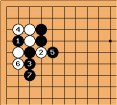 AI Variation | 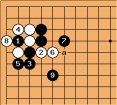 AI Fight | 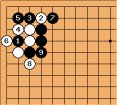 Resistance | 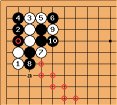 Bad Ladder |
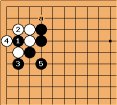
- Historically, the
 hane-cut was considered to be a type of trick play that requires a favorable ladder. If White plays the atari with
  (Diagram 1), White is said to have been tricked because they are sealed in on both sides. Furthermore, Black's future descent at a is sente, since it would turn the corner into a ko if White ignores. In the AI era, the simple variation where White is sealed in is not as bad as previously believed. White has sente, and AI thinks the outcome is even.
- Strong AI programs often recommend cutting with
 to resist being sealed in. If Black goes back to capture the cutting stone with
  , this outcome is satisfactory for White (Diagram 2). Black can also turn with
  to invite a fight (Diagram 3), but professionals think that this fight favors White without any regional support.
- Traditionally, the hane with
 was the proper way to resist being sealed in (Diagram 4). However, in the AI era, this variation is often felt to be better for Black.
- If the ladder is bad for Black, it is a disaster (Diagram 5).
- Although the hane-cut is often called hamete, strong AI programs do not criticize the hane-cut very much. It is often just as good as the hane-extend (and sometimes even better). For this reason, the hane-cut can be considered a valid contemporary move to play for influence on an empty board when the ladder works.
Discussion
Why isn't the hane-extend played anymore?
When to play the double hane?
In the AI era, the double hane joseki is considered an even result on an empty board, and it is reasonable for a player to play it from the start. However, there are certain special circumstances when the double hane might be more or less favorable.
The ponnuki that arises from the joseki radiates a powerful amount of influence. White generally does not want to give Black a ponnuki in situations where Black could make effective use of the ponnuki's influence. By corollary, it is best for White to play the double hane in situations when the top side is small, or if the ponnuki would overconcentrate Black.
White will have bad aji after playing the double hane joseki. Due to the bad aji, Black can later play at z in sente, which would threaten to rescue Black's captured stones  . If White is not comfortable with a sente move at z, it may be preferable to choose a different joseki.
Chen Zijian vs. Ding Hao (2020) illustrates a game where the double hane with  -
- is the best move. In this board position, we can immediately see that the top side is small, since White's group in the upper right corner is unconditionally alive. Neither player can make a large moyo out of the top side, so it is not an interesting area of the board. White is perfectly content to give Black a ponnuki in the top side, and Black cannot make effective use of the influence from the ponnuki.
It is also noteworthy to mention that White doesn't have potential on the left side of the board either. Black's  stones are stable and decrease the value of the left side. It doesn't make sense for White to build a wall when White lacks outside potential. Since creating a wall is uninteresting, White might as well play to keep the corner territory.
When to play the inside hane?
When to play the hane inside cut?
yuzukitea: The hane-cut variation requires a favorable ladder, and it can be played on an otherwise empty board in the early opening. Strong AI programs often consider it equally as good as the hane-extend, although it is slightly worse (by a few fractions of a point) compared to the double hane. Although it is a reasonable move, I struggled to find examples in professional games where AI thought that the hane-cut was better than the double hane.
Komatsu Hideki vs. Chin Kaei is one rare example of a game where AI prefers the hane-cut over the double hane. This game has several notable features. First, the  stone breaks the ladder. Second, White has potential on both the left and bottom sides. Third, the double hane at b isn't a good move because the
  stone is misplaced. If White plays the double hane joseki, Black can effectively undercut the
  stone with a large knight's move at l.
It is also worthwhile to mention that the hane-extend at c isn't interesting either. The  stone has very poor placement, and it would also be inefficient in the hane-extend joseki.
Since b and c aren't good moves, it appears that White is left with the third option to play with hane-cut.
Does this mean that the hane-cut is generally a good move to play in double wing formations? Unfortunately, this doesn't seem to be the case, as I loaded multipled double wing formations while searching for examples in professional games. The spacing of the stones in the double wing formations seems important (third line vs. fourth line). My impression is that the hane-cut is a special case move that can be considered in relation to suboptimal spacing of nearby stones in the area.
Is the cross cut an overplay?
The cross-cut with  is generally considered an overplay on an empty board, and it is not joseki. However, it can be an extremely effective and powerful fighting move if the local circumstances favor Black.
Gu Li vs. Choi Cheolhan (2012) is an example of a professional game where the cross-cut is the AI recommended move. Black is thick in the vicinity, so splitting White into two groups and starting a fight is advantageous.
What if white plays the hane on the wrong side?
If White tries to reverse the order in the hane-stretch variation by playing  before
  , then Black may punish with
  . This lets Black shut White into the corner (particularly as a is Black's sente). White ends up with a smaller corner (than in the joseki) and Black may be in a position to make territory on the left. The only positional disadvantage for Black is the aji of the cut at b. However, it general pales in comparison to White's initial loss and Black's overall gain. See 4-4 point 3-3 invasion, W reverse playing order.
References
- [1] Frequency statistics were obtained from
![[ext]](images/extlink.gif) Waltheri's Go Pattern Search using the full database restrained to a local search (accessed July 2022).
Waltheri's Go Pattern Search using the full database restrained to a local search (accessed July 2022).
- [2] AI Weiqi Joseki Dictionary - Jiang Weijie (2021)
- [3] (Bilbili) Zhan Ying:
![[ext]](images/extlink.gif) AI围棋定式3-最受欢迎的点三三应用秘籍 (2021) (CN)
AI围棋定式3-最受欢迎的点三三应用秘籍 (2021) (CN)
![[Diagram]](diagrams/36/2119770f1fcf9121b90d874c2f4790b4.png)
![[Diagram]](diagrams/6/7a8ca4bf67e8b311b8fe40176a965f8b.png)
![[Diagram]](diagrams/52/52a579b34eff8ed7480c990ab6ec706a.png)
![[Diagram]](diagrams/42/d5f6f39d8fd09ab1f31e9ae5b1f20933.png)
![[Diagram]](diagrams/43/bb2d65ffcde4da2fc6110d7c93a08e49.png)
![Sensei's Library [Welcome to Sensei's Library!]](images/stone-hello.png)