4-4 6-3 enclosure
Return to parent joseki article: 4-4 point Josekis
The 4-4 Point, Small Knight Enclosure is the most common enclosure played from a 4-4 point. It is commonly employed in contemporary go as it offers a balance of territory and influence, and it is well-regarded by professionals and AI programs.
Importantly, the knight's move discourages an early 3-3 invasion. It is still possible for White to create a small living group in the corner with a ko (or White can threaten to escape along the side), but this is not very appealing in the early opening. In the modern era, early 3-3 invasions are fashionable, so discouraging 3-3 invasions with a small knight enclosure is a particularly valuable move in the opening.
An enclosure on facing the top side projects influence towards the left side. However, there are also many methods for White to approach from the left side, so enclosures are often played in a direction that denies a future approach.
| Table of contents |
Quick Navigation
Moves are listed by frequency in recent professional games (2018-2023)[1], which is sensitive to whole-board position. Bolded moves are commonly considered joseki.
- d, 2-5 Skirt approach (susogakari) - (joseki) (common) (traditional) (AI favorite) (beginner)
- b, Shoulder hit - (joseki) (common) (AI favorite) (intermediate)
- a, Small knight approach - (joseki) (situational) (AI favorite) (advanced)
- f, 2-4 Submarine approach - (joseki) (situational) (traditional) (beginner)
- c, Hoshishita splitting move - (traditional) (common)
- e, Hoshiwaki splitting move - (traditional) (common)
- g, One-space alternate approach - (rare/situational)
- h, 3-4 attachment - (rare/situational) (inferior)
- i, 3-7 attachment - (rare/situational)
- z, 3-3 invasion - (rare) (inferior) (ko)
- e, Small castle enclosure - (joseki) (traditional)
- d, Double knight enclosure - (modern)
- a, Hoshishita (5-space low) extension - (traditional)
- b, Hoshiwaki (4-space low) extension - (traditional)
- c, Hoshi (5-space high) extension - (traditional)
Overview of Joseki
Tenuki
As it is with most enclosures, in many circumstances the best option is to tenuki. Once Black has played a small knight enclosure, the corner is approximately settled, so it is not urgent to address this region of the board. Many players will play other big moves in the opening before turning their attention to this enclosure.
White is unlikely to develop a large amount of territory in this region, and it is most common for White to consider returning when they are concerned that Black is developing a moyo that is too large. Consequently, many of White's moves are played with the aim to reduce or invade Black's framework, and they may potentially finish the exchange with a weak group. White's expectations must be tempered, as they are entering an area of Black's strength.
Splitting Move
See main article: Splitting Move
Traditionally, the most common way to address an enclosure was to play a splitting move along the side. This follows the go proverb, "The enemy's key point is yours", as Black's next local continuation is to play an extension on the left side.
Splitting moves have declined in popularity ever since the AI revolution, but splitting moves on a side when all corners are already enclosed/taken (in the late opening) is much more reasonable than a splitting move in the early opening when an available corner is still open for approach. In this situation, they still remain quite common in the post-AI era, and it is a good strategy to disrupt a moyo. If there is enough space to play a splitting move, it is one of the most reliable and simple ways to create a stable base in the enemy's sphere of influence.
2nd Line Approach
An approach on the second line, also known as a submarine or skirt play, aims to make miai of the corner and side. Depending on Black's response, white can either live small in the corner or exit with a weak group on the side. This type of approach is typically results in an inferior result than approaching an unenclosed corner, so Yang Yilun calls it a "fourth class" move that is least urgent to play in the opening. Given the go proverb that the "The second line is the route to defeat", second line moves should be avoided as much as possible in the opening, as they are inefficient.
Nonetheless, if approaching the small knight enclosure is strategically necessary, a second-line approach is the traditional method to achieve this goal. Amateurs and students are often recommended these approaches, as they are relatively simple joseki and allow White to establish a small base that is easy to handle. They can be conceptualized as a type of invasion or reduction move. However, ever since the AI revolution, submarine approaches have become increasingly less common.
|
2-5 Skirt Approach (~8%)[1] | ||
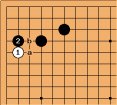 Block (~50%)[1] | 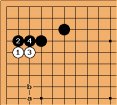 Block/Extend | 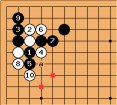 Block/Wedge |
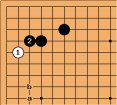 Iron Pillar (~18%)[1] | 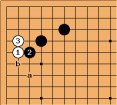 Contact (~16%)[1] | 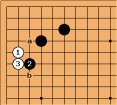 Press (~13%)[1] |
- The 2-5 skirt approach is the main second-line approach currently recommended by professionals in most circumstances. This approach typically favors the outside and encourages Black to take the corner, but it is also possible for Black to take outside influence or provoke a fight.
- Blocking (Dia 1) with an attachment is straightforward, common, and territorial. White is able to create a weak group on the outside, whereas Black gets the corner. A more complicated variation can occur if White wedges with
 at b, which can help White settle with a stronger group, but the general idea is similar. In the wedge variation (Dia 3), Black obtains a larger corner, but White gain many forcing moves on the outside that make it easier to develop a position on the left side. However, sometimes the wedge variation cannot be played if Black has additional stones supporting the corner.
- Descending with an Iron Pillar (Dia 4) is simple. This move encourages White to stay light and thin. However, White retains some potential for better end game in the corner.
- Less commonly, black can emphasize the left side with the Diagonal Attachment (Dia 5) on top. This typically forces White into the corner, but it can also result in a fight or an exchange depending on the players' objectives and the overall state of the board.
- The Small Knight Press (Dia 6) is currently played by contemporary professionals with the aim to start a fight with
 at a. Black can also play b to take the outside, but giving White a fairly sizable corner so easily is often considered slack.
|
2-4 Submarine Approach (~3%)[1] | ||||
 Thrust (~42%)[1] |  Pincer (~12%)[1] |  3-3 Point (~10%)[1] |  Small Knight (~8%)[1] |  Shoulder Hit (n/a) |
- The 2-4 Submarine Approach is the second traditional method to approach an enclosed 4-4 point that can be utilized in special circumstances.
- In contemporary go, this move is rarely seen, in part because AI often gives it a lower evaluation in many circumstances. Park Youngwoon (Baduk Doctor) describes it as a "disappeared joseki"[5] and Ji Lili (3p) generally does not recommend it[4]. However, Do Eunkyo (1p) describes several circumstances when it is a good move[3].
- In general, White can play the the 2-4 approach when they believe that Black will not pincer as depicted in Dia 2. The pincer results in an unpleasant result for White when Black has potential towards the left side. If White enters the corner with
 at a, White can live small in gote (or leave the corner as a ko in sente), which is dissatisfactory. If White goes through the elephant eye with
  at b, Black gains some stones facing the left side while White lacks a base. Consequently, the 2-4 approach is only an appropriate move when Black lacks potential towards the left side, or if the projected fight is favorable for White. It can also be considered when the 2-5 approach seems unattractive.
- Assuming that Black is unwilling to pincer, Black may Thrust (Dia 1), which allows White to form a group along the left side. The outcome is similar to the Iron Pillar variation from the 2-5 Approach; the main benefit for White was that Black was unable to play the 2-5 Block Variation.
- It is also possible for Black to yield the corner. This is typically done with the Small Knight (Dia 4) rather than the Diagonal (Dia 5), since the Small Knight variation gives Black better shape on the outside. Notably, the diagonal transposes 2-5 approach contact variation, but Black can do better when White approaches from the 2-4 point.
- It is also sometimes possible for Black to tenuki in response to the 2-4 approach. If White jumps to the 3-3 point, the shape is awkward and inefficient, which indicates that the 2-4 approach lacks a compelling follow-up. In comparison, the 2-5 point makes better shape in relation to the 3-3 point.
Fighting Approach
See main article: 4-4 point low approach low extension, tenuki
|
Small Knight Approach (~56%)[1] | |||
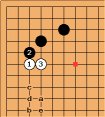 Kick (~20%)[1] | 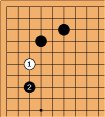 1-Space Pincer (~9%)[1] | 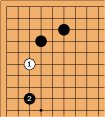 2-Space Pincer (~9%)[1] | 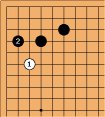 Jump Down (~4%)[1] |
- Currently, the most common method for professionals to approach a 4-4 point enclosure is the direct small knight approach. In a survey of recent games (2018-2023), it was utilized ~56% of the time[1].
- Before the AI revolution, this move was not commonly seen, as Black will kick and pincer the approach stone (Dia 1). This was previously to believed to be difficult for White, but professionals now believe that there are many ways to handle this group. Black's corner has weaknesses, so White can lean on the top side for strength. Alternatively, there may be an opportunity to fight with the pincer stone. White's group often finishes with influence in the center of the board.
- If the outside is important, Black can pincer directly on the outside. However, White's approach stone retains vitality, and there is a possibility it may still live in the corner.
- If kicking is unfavorable, Black may choose to jump down to protect the corner territory (Dia 4).
Shoulder Hit
|
Shoulder Hit (~21%)[1] | ||
 Push Up (~29%)[1] |  Push Side (~16%)[1] |  Capping Pincer (~5%)[1] |
 3-Space High (~10%)[1] |  2-Space High (~7%)[1] |  2-Space Low (~5%)[1] |
3-4 Attachment
|
3-4 Attachment (~2%)[1] | |||
 Hane Up |  Hane Down |  Cross-Cut |  Slack |
 Life Var. A |  Fight Var. A |  Fight Var. B |  Life Var. B |
Other Moves
|
Other moves | |||
 Alt. Approach |  3-7 Attach |  3-3 Ko |  3-3 Escape |
Double Enclosures
|
Double Enclosures | |
 Double Knight (~8%)[1] |  Small Castle (~1%)[1] |
Discussion
When to play the small knight approach?
When to play the shoulder hit?
When to play the 2-5 approach?
When to play the 2-4 approach?
|
Cho Tae-hyeon vs. Kang Hun (2022-09-12) | |
References
- [1] Frequency statistics were obtained from SGF files of professional games downloaded from
![[ext]](images/extlink.gif) kifudepot (Jan.2018 - Feb.2023) restrained to a local search using q5go.
kifudepot (Jan.2018 - Feb.2023) restrained to a local search using q5go.
- [2] (Youtube) Do Eunkyo (1p):
![[ext]](images/extlink.gif) Invasion (1) When you should fly low (2022)
Invasion (1) When you should fly low (2022)
- [3] (Youtube) Do Eunkyo (1p):
![[ext]](images/extlink.gif) Invasion (2) Now you can dive freely (2022)
Invasion (2) Now you can dive freely (2022)
- [4] (Youtube) Ji Lili (3p):
![[ext]](images/extlink.gif) 纠正我们学过的错误下法:第十二讲·堂堂正正 (2022)
纠正我们学过的错误下法:第十二讲·堂堂正正 (2022)
- [5] (Youtube) Park Youngwoon (7d):
![[ext]](images/extlink.gif) The disappeared joseki (All about corner 3) (2020)
The disappeared joseki (All about corner 3) (2020)
![[Diagram]](diagrams/29/4afd419291021a6691d11780fe8d333d.png)
![[Diagram]](diagrams/46/cfa9d4fd9739b40907f380ad3e0f1239.png)
![[Diagram]](diagrams/35/c5c51c5525e7ec55b90d2613186fdcbd.png)
![[Diagram]](diagrams/9/7a643c88c8c2ab5a7ae6ede393ed9f63.png)
![[Diagram]](diagrams/31/6759ff7dc336b20408439591b357de25.png)
![[Diagram]](diagrams/7/138c5577842af91ea269504536a26966.png)
![[Diagram]](diagrams/22/f9faf70ac2ea362d0c5514927647c57c.png)
![[Diagram]](diagrams/28/1a63444edb5696a648db6cf2e65fce27.png)
![[Diagram]](diagrams/19/1902e36e274617b315d14bfab5a2fc3c.png)
![[Diagram]](diagrams/4/f347490c7fe553b0ea543c6a80572cdc.png)
![[Diagram]](diagrams/45/ce6735d25b6e9dcee13c6c8243a38b4a.png)
![[Diagram]](diagrams/45/550dce877cdae881a2bb7cfe777e4d36.png)
![[Diagram]](diagrams/6/26a6612b33990c9b472ac9c1f0b9ee6d.png)
![[Diagram]](diagrams/43/c320b9069f6a71a03f97b11c1cecc8e2.png)
![[Diagram]](diagrams/36/2db4aceda76dcb2f0ac17673da60f40a.png)
![[Diagram]](diagrams/5/234aa485825d3b46fa6b692c464d0834.png)
![[Diagram]](diagrams/6/a1477e49a701f73361f007a24569275c.png)
![[Diagram]](diagrams/3/b63b8d06cf84ebe1187242c58eb753a1.png)
![Sensei's Library [Welcome to Sensei's Library!]](images/stone-hello.png)