3-4 point Josekis
Return to parent article: Joseki
3-4 Point Joseki are standard sequences of moves played around the 3-4 point that result in a locally even exchange. Joseki related to this position can be classified into approaches, enclosures, and attachments. A number of unusual joseki are also special strategies to deal with fuseki openings like the Chinese Fuseki.
The 3-4 point (aka komoku or 'small eye') emphasizes a balance of territory and influence. It looks forward to development along one side of the board and/or forming a corner enclosure. For many centuries, the 3-4 point has been the most common way to start a game. In modern go, it is one of the most popular openings (~40% frequency [1]) and is well-regarded by strong AI programs like AlphaGo.
Popular joseki related to the 3-4 point have evolved over the centuries. Some of the patterns listed in this reference are no longer considered "joseki", but the viability of unusual moves is highly sensitive to the surrounding board position. The difference in winning rate between traditional and modern joseki is often less than a point, so many old joseki are still valid and playable particularly at the amateur level.
| Table of contents |
Quick Navigation
Moves are listed by frequency in professional games[1], which is sensitive to whole-board position. Bolded moves are commonly considered joseki.
- a, 3-4 Point Low Approach - (joseki) (AI favorite) (common)
- b, 3-4 Point High Approach - (joseki) (AI favorite) (common)
- c, 3-4 Point Two-Space Low Approach - (joseki) (common)
- d, 3-4 Point Two-Space High Approach - (joseki)
- g, 3-4 Point 4-4 Attachment - (joseki) (situational) (chinese fuseki)
- e, 3-4 Point Five-Space Low Splitting Move - (situational)
- f, 3-4 Point Six-Space Low Splitting Move - (situational)
- y, 3-4 Point 3-3 Attachment - (rare) (ko threat)
- z, 3-4 Point Armpit Hit - (rare/mistake)
- a, 3-4 Point Small Knight Enclosure - (joseki) (common) (AI favorite)
- c, 3-4 Point Large Knight Enclosure - (joseki) (common) (AI favorite)
- d, 3-4 Point One-Space High Enclosure - (joseki) (common) (AI favorite)
- h, 3-4 Point Two-Space High Enclosure - (joseki) (common) (AI favorite)
- b, 3-4 Point Chinese Fuseki Extension - (common) (chinese fuseki)
- e, 3-4 Point Kobayashi Fuseki Extension - (common) (kobayashi fuseki)
- f, 3-4 Point Micro-Chinese Fuseki Extension - (common) (micro-chinese fuseki)
- g, 3-4 Point High Chinese Fuseki Extension - (common) (chinese fuseki)
- x, 3-4 Point Reverse Small Knight Extension - (rare/mistake)
- j, 3-4 Point 4-4 Attachment - (joseki) (situational) (AI favorite) (chinese fuseki)
- c, Chinese Fuseki 3-4 Point Two-Space High Outside Approach - (joseki) (traditional) (chinese fuseki)
- d, Chinese Fuseki 3-4 Point Two-Space Low Outside Approach - (joseki) (traditional) (chinese fuseki)
- f, Chinese Fuseki 3-4 Point One-Space High Outside Approach - (joseki) (traditional) (chinese fuseki)
- h, Chinese Fuseki 3-4 Point One-Space Low Outside Approach - (joseki) (traditional) (chinese fuseki)
- e, Chinese Fuseki 3-4 Point One-Space High Approach - (disadvantageous) (AI favorite)
- a, Chinese Fuseki 3-4 Point Five-Space Low Outside Splitting Move - (chinese fuseki)
- b, Chinese Fuseki 3-4 Point Five-Space High Outside Splitting Move - (rare) (chinese fuseki)
- g, Chinese Fuseki 3-4 Point Three-Space Low Outside Approach - (rare) (chinese fuseki)
- i, Chinese Fuseki 3-4 Point Three-Space High Outside Approach - (rare) (chinese fuseki)
Overview of 3-4 Point Joseki
Corner Approach Joseki
|
Approach Joseki | |||
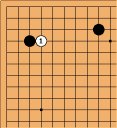
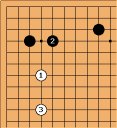
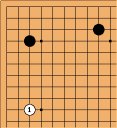
 Small Knight Approach (~53%)[1] |  One-Space High Approach (~45%)[1] |  Two-Space Low Approach (~7%)[1] |  Two-Space High Approach (~4%)[1] |
- The small knight's approach is the most common way to approach a 3-4 point, and it is especially favored by strong AI programs. The knight's move aims to contest Black's corner and it emphasizes territory. Historically, it was common for Black to pincer the approach stone, which can result in complicated and difficult fighting, but pincers have fallen in popularity since the AI revolution.
- The one-space high approach is another common way to approach the 3-4 point, and it emphasizes influence. It is well-regarded by strong AI programs and very popular among amateurs due to its simplicity, but current top professionals consider it to be slightly inferior to low approach. The difference in projected winning rate is less than one point, so for most amateur players the high approach is equally as good as the low approach.
- The distant approaches are primarily played to discourage a pincer, but they allow black to take the corner territory easily. The two-space low approach was historically a classic approach to the kobayashi fuseki. These joseki result in a local loss for White.
Enclosure Joseki
|
Enclosure Joseki | |||
 Small Knight Enclosure (~30%)[1] |  Large Knight Enclosure (~14%)[1] |  One-Space High Enclosure (~8%)[1] |  Two-Space High Enclosure (~3%)[1] |
- The small knight enclosure is the safest of the four 3-4 point enclosures. It firmly secures a ~12 point corner, but it projects less influence towards the sides of the boards compared to the other enclosures.
- The large knight enclosure is similar to the small knight enclosure but it defends the corner much more loosely. It is possible for White to invade inside and live small, but this result is typically not good enough for Black.
- The one-space high enclosure aims to project influence towards the left side of the board. However, White will have an opportunity to approach on the upper side.
- The two-space high enclosure, also known as the "AlphaGo Enclosure", was historically viewed as a bad move. It places the most emphasis on whole-board influence, but the corner is very vulnerable and many complications can arise. It was popularized by early iterations of AlphaGo Master (c. 2016).
Chinese Fuseki Joseki
See main article: Chinese Fuseki
|
Chinese Fuseki Joseki | |||
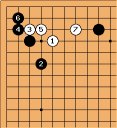
 4-4 Point Attachment |  Two-Space High Outside Approach |  Three-Space Low Splitting Move |  One-Space High Approach |
- The 4-4 point attachment is a modern move that was popularized by strong AI programs like AlphaGo. The attachment is a versatile way for White to develop a position on the left side, but Black has several complicated ways to resist. Nonetheless, it is considered a good way to counter the chinese fuseki ever since the AI revolution. The 4-4 attachment can also be applied to many other situations.
- Approaching from the "wrong side" was traditionally a special strategy to tackle the chinese fuseki, and the two-space high outside approach was classic. However, strong AI programs do not consider it to be a good move, since Black gains a comfortable corner far too easily. Nonetheless, it can still be a good tactic for amateur players, since these approaches avoid the complications of the chinese fuseki and simplify the position.
- Tenuki from the 3-4 point is one of the most common choices when playing against the chinese fuseki. Since Black already invested a stone in the area, it is not urgent for White to approach the 3-4 point. Historically, it was common for White to play a splitting move or extension along the side. The chinese fuseki emphasizes fast development, so traditional rationale was that White should also play fast in order to keep up with Black.
- The one-space high approach is the classic move that falls into the "trap" of the chinese fuseki. It was historically considered a bad result for White. However, strong AI programs disagree and consider this position to be playable for White.
History
Historically, the one-space low approach was the standard play; it was played in over 90% of the cases between 1900 and 1910.
During the the Shin Fuseki Movement of the 1930's, professionals experimented with the two-space low approach, and it was played frequently from 1934 to 1937. Later on, this move gradually lost in popularity and is rarely played today, although Go Seigen advocated for it during his era.
The one-space high approach started to grow in popularity in the 1960's, and by the 1980's the high approach overtook the low approach. One reason for this was because the low approach would often be pincered. Professionals tended to favor the high approach in the late 20th century.
However, AI revolution changed this perspective once again, since strong AI programs prefer the low approach over the high approach, and AI rarely plays pincers. Ever since 2016, professionals now play the low approach more frequently than the high approach. Currently, top professionals tend to believe that the low approach is marginally better than the high approach.
Discussion
Low Approach vs. High Approach?
See main article: 3-4 approach, high or low
Bob McGuigan: I'm not sure these simple statistics tell the whole story. It would be more interesting to see what happens in positions where both high and low approaches are appropriate. For example, the high approach is often more appropriate in moyo-oriented games, the low approach in territorial games. In other words, whether the high or low approach is played depends on the larger scale position, not just on the corner.
tapir: No, it does not, but it should raise awareness about historical change in joseki choice right from the beginning. (When you first come across a 3-4 point and wonder what you can do after that and look in SL for ideas that is. Leaving you with a less rigid concept of Joseki) Even if it does not tell the whole story it is based on a database research though. Another background for this statistics is to help players keep in mind that the low approach is still a move to consider. (I know a lot of players, who never play it.)
yuzukitea: As of 2021, top professionals and strong AI programs prefer the low approach, as it is believed that the defender obtains slightly too big of a corner with the high approach. However, the difference is marginal, and in many circumstances the difference in projected score ~0.1 points or less. For most amateur players, both approaches are equally good, and it ultimately depends on whether the player prefers territory or influence in a particular board position. When I was a double-digit kyu, I tended to prefer the one-space high approach because the joseki is simple and I was afraid of pincers. However, both approaches frequently appear in amateur games, and it is a good idea to get comfortable with both.
Approaching vs. Enclosing Corners
Further Reading: Leela Zero's opening gospel
Strong AI programs tend to assign similar value to approaching and enclosing symmetrical corners. Approaching corners is typically more popular among most players, but it is mainly a matter of playing style and personal preference.
Which enclosure should I choose?
yuzukitea: Generally speaking, it is advisable for beginners to play the enclosures that they are familiar with. Each enclosure has its own weaknesses, and knowing the joseki related to those weaknesses is recommended. Players will naturally develop opinions about which joseki to play in various situations once they understand the strengths and weaknesses of each enclosure.
Of the four main enclosures, the small knight enclosure is the simplest enclosure with the fewest complications, but it is the least favorite of strong AI programs because the shoulder hit is an effective way to limit the potential of the small knight's enclosure. The remaining three enclosures are all well-regarded by strong AI programs.
The two-space high enclosure deserves special mention because it is most complicated and difficult-to-manage enclosure. Although it is sometimes called the 'AlphaGo Enclosure', it is important to recognize that it is not particularly preferred by current versions of strong AI programs. AlphaGo Master (c. 2016) was known for playing the two-space high enclosure, but early versions of AlphaGo also had a play style that was more oriented towards influence. As of 2021, successor AI programs have developed a stronger bias for territory, and current versions of Katago and other AI programs do not necessarily favor the two-space high enclosure over the one-space high enclosure.
See Also
References
- [1] Frequency statistics were obtained from
![[ext]](images/extlink.gif) Waltheri's Go Pattern Search using the full database restrained to a local search (accessed August 2021). Due to the weighting of older games in the database, the certain variations appear to be less frequent than it actually is in recent years.
Waltheri's Go Pattern Search using the full database restrained to a local search (accessed August 2021). Due to the weighting of older games in the database, the certain variations appear to be less frequent than it actually is in recent years.
![[Diagram]](diagrams/41/81c91f79c27de6a30c9236db4a5906c5.png)
![[Diagram]](diagrams/32/b3459ea3165651459e7f5ec0a19f8e70.png)
![[Diagram]](diagrams/51/c83c2e26b777811d457629f70cca0cef.png)
![Sensei's Library [Welcome to Sensei's Library!]](images/stone-hello.png)