4-4 Point 3-3 Invasion 3 Stone Hane
Return to parent joseki article: 4-4 point 3-3 invasion joseki
The 4-4 Point 3-3 Invasion, Three Stone Hane is a common shape that appears in several 3-3 invasion joseki, particularly since the AI era. It is extensively utilized at all levels of amateur and professional play, but it has a vast number of possible variations that are sensitive to overall board position and ladders. Although the continuations may seem complicated, they are must-know joseki for any intermediate level go player.
The Three Stone Hane is unsettled, so it is best to think of it like the midway point in an unfinished joseki. The continuations are all very big (valuable), and they are often played as soon as possible. That said, it is also very common for either player to tenuki during the early opening. Many players will await more information before deciding which continuation to pick, and it is easier to decide once more pieces have been placed on the board.
Compared to the popular alternative Simple 3-3 Invasion Slide Joseki, the Three Stone Hane is more unstable. The first player to resume the joseki obtains a considerable local advantage.
| Table of contents |
Quick Navigation
Moves are listed by frequency in professional games[1], which is sensitive to whole-board position. Bolded moves are commonly considered joseki.
- a, 4-4 Point 3-3 Invasion, 3 Stone Hane, Hane - (joseki) (common) (intermediate) (AI favorite)
- t, 4-4 Point 3-3 Invasion, 3 Stone Hane, Tenuki - (joseki) (common) (beginner) (AI favorite)
- b, 4-4 Point 3-3 Invasion, 3 Stone Hane, Extend - (joseki) (common) (beginner) (AI favorite)
- c, 4-4 Point 3-3 Invasion, 3 Stone Hane, Double Hane - (joseki) (common) (intermediate) (situational)
- d, 4-4 Point 3-3 Invasion, 3 Stone Hane, Tiger's Mouth - (rare) (situational)
- e, 4-4 Point 3-3 Invasion, 3 Stone Hane, 5-Space Extension - (rare)
- a, 4-4 Point 3-3 Invasion, 3 Stone Hane, Tenuki, Atari Up - (joseki) (common) (beginner) (AI favorite)
- b, 4-4 Point 3-3 Invasion, 3 Stone Hane, Tenuki, 3-Space Pincer - (joseki) (common) (intermediate) (AI favorite)
- c, 4-4 Point 3-3 Invasion, 3 Stone Hane, Tenuki, Cut - (joseki) (common) (intermediate) (situational)
Overview of Black Continuations
Wall Variations
See main article: 4-4 Point 3-3 Invasion 3 Stone Hane, Extend
The extend with  is the simplest variation, and it is played to build a wall in gote.
This AI joseki is very similar to the traditional 3-3 invasion hane-extend variation, and it emphasizes the same principles, but White has one additional point of territory and easier life. In exchange, Black's wall is much thicker, and the peep at a is much less effective. Black can even resist with peep with a move like b. Strong AI programs recommend this variation over the traditional variation.
This joseki gives an even result, but it is not especially common to see this joseki in modern play. Ever since the AI revolution, most top professionals have a territorial play style with an emphasis on sente, and many people think it is difficult to play with influence. It is most common for Black to build a wall like this when they have potential on the top side of the board.
Hane Variations
See main article: 4-4 Point 3-3 Invasion 3 Stone Hane, Hane
|
Hane-Cut Variations (~27%)[1] | |||
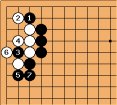 Sealed In (~5%)[1] | 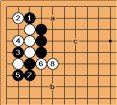 Hane-Cut, Fighting (~4%)[1] | 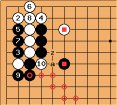 Switch Sides (Var. A) (~12%)[1] | 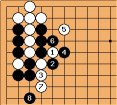 Switch Sides (Var. B) (~3%)[1] |
- The hane with
 is typically Black's strongest local move. It is most effective when Black possesses the ladder, but it is still a good move even when Black lacks the ladder.
- The subsequent inside cut with
 is most common and highly effective, which threatens to take the corner territory. Most variations end in gote for Black.
- If White wants the corner (Diagram 1), White may capture the cutting stone with
 , but they are sealed inside on both sides. This outcome is simple, but it is dissatisfactory to be locked in on both sides. If White does not fear a potential ko, it is possible to resist by cutting with
  (Diagram 2) and fighting. Capturing the
  stone and the
  stone is miai, so White is alive in the corner.
- White can also resist being sealed in by switching sides with the atari at
 (Diagram 3). This is the most common variation in professional games. If the ladder is good for Black, Black can play the
  stone at a, which is often considered a good result for Black. If the ladder is bad for White, sometimes White will play an alternate fighting variation (Diagram 4) to contest Black's easy profit.
|
Hane-Double-Hane Variations (~16%)[1] | |||
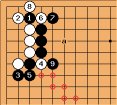 Ladder (~5%)[1] | 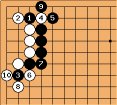 Ponnuki (~2%)[1] | 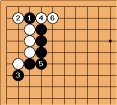 Alt. Side (~2%)[1] | |
- If Black has the ladder, the double hane can be played in an attempt to seal White's corner in on both sides (Diagram 1). In exchange, White will be able to play a ladder breaker.
- If White does not want to be sealed in, they can resist with the atari at
 (Diagram 2). White will be able to break out on one side, but Black gets to choose the side and Black ends with sente.
- Michael Redmond describes the double hane variation as a move that favors developing the left side[3]. Compared with the inside cut (shown above), the double hane avoids the possibility of a fight and typically makes Black thicker on the left side at the local expense of the corner/top. The double hane is most often seen as part of a moyo/fuseki strategy or as a safe method to switch sides when White has pincered Black's wall.
Tenuki
It is possible and common (~36%)[1] for Black to tenuki. This is often done in the early opening, as sometimes a couple moves elsewhere on the board can change the ladder situation.
However, Black should not delay too long. The position is unstable and both players would like to obtain the first follow-up. The first player to return to this corner obtains considerable profit, so it is prudent for advanced players to read several moves into their opponent's fuseki. While Black may tenuki, ultimately Black hopes to return to this corner first.
Sente Variations
| Double Hane | Hanging Connection | |
- It is possible for Black to take sente by playing the double hane with
 . This is most commonly done as a form of kikashi, such as when White pincers Black's wall and Black hopes to gain more strength to counter pincer. The double hane grants White a ponnuki and a living group, so it is best done when the left side is small.
- There is also a potential ko (Diagram 1). Later, Black a will start a ko. White can stop this by playing b herself.
- Michael Redmond (9p) calls the double hane in Diagram 2 a poor result for Black.[3]
- The hanging connection with
 is a rare (~2%)[1] move that Black can play to take sente. It is not a very elegant move, because when White takes the peep at a, Black has an empty triangle.
Extensions
It is possible to play an extension from the three-stone hane shape -- typically a five-space high extension with a symmetric enclosure. This can be thought of as a fuseki strategy that was originally popularized by AlphaGo Master (who lost to AlphaGo Zero 12 out of 13 times using this fuseki), and the popularity of this fuseki rose and fell in concordance with the shift in top AI programs circa ~2018. The contemporary (2022) variant of this fuseki is most often played with the one-space high enclosure at x.
It is rare for Black to make any other extension. The simplest reason for this is that the joseki in the upper right corner is unfinished. Most continuations of the three-stone hane joseki end with Black influence facing the right side. Additionally, White has sente, so the simple atari at a and descend at b undercuts Black's territory.
To put it briefly, the three-stone hane shape most often results in a wall facing the right side. Unless part of a fuseki, it is inefficient to play a gote extension on the wrong side, because it limits Black's future options in the corner.
Overview of White Continuations (Tenuki)
Atari-Up Variations
| Atari Up | |
- The most common (~23%)[1] White continuation is the atari up. The subsequent descend with
 (Diagram 1) is territorial and is almost always a good move regardless of the board position. Black has an open skirt, which makes this variation an effective way to counter moyo-building strategies on the top side of the board. Black's wall is also weakened, so it is also vulnerable to pincers.
- If the top side of the board is small, White can also make a tiger's mouth with
 (Diagram 2) to emphasize the left side of the board.
Pincer Variations
| Pincer | |||
- Strong AI programs have revealed that the three-space extension is the vital point of these corner joseki walls, so the three-space high pincer is overwhelmingly the most common pincer in professional games (Diagram 1). Professionals have also played the four-space high pincer (b) when they are more concerned about counter-pincers. Typically, high pincers rather than low pincers are played.
- The three-space high pincer aims to cut at z (Diagram 1), which is severe. For this reason, it is rare for Black to tenuki.
- It is natural and common for Black to extend with
 (Diagram 2) to strengthen themselves, and White will obtain a two-space extension on the fourth line. It is also possible for Black to play a kikashi variation (i.e. double hane) to build a wall in sente and counter-pincer.
- If the ladder works for Black, it is straightforward to switch sides to develop the left side (Diagram 3). Note that professionals rarely play the inside cut
 at x at this point because White will almost certainly choose the fighting variation, which has the added support of the
  pincer stone.
- The attachment with
 (Diagram 4) is also seen in professional games. It typically results in a cross-cut fight.
Cut and Fight Variation
Playing atari on the other side with  leads to a fight upto
  . The moves shown here are a common continuation, but as usual in fighting joseki there is a lot of room for variation, and the fight is only beginning.
Black Discussion
When should Black hane and inside cut?
The  hane at a is Black's strongest local response. It can be the considered the default general-purpose follow up.
Several variations arising from the hane and inside cut are sensitive to ladders. Having the ladder is beneficial for Black, but not essential. The hane is a valuable continuation regardless of whether the ladder works. There is a chance that a fight can arise from the cut at z, but this fight is manageable for Black on an empty board.
The  hane also means that Black intends to switch the direction of their wall to the top side. In this regard, the hane most sensible when Black has potential towards the top side of the board.
A game played by Tao Ran vs. Gao Xing (2019) is a good opportunity to discuss joseki and fuseki choice. In this game, Black quickly approached both corners and also left one approach unsettled. These approach stones also serve to break the ladder regardless of which corner White chooses to invade. In the game, White invaded the top right and Black blocked in a direction that favors the ladder with a plan to develop the top side.
Which continuation makes the most sense?
If Black continues at b directly, Black will end in gote, and White will be able to atari at e to erase the value of the top side.
If Black continues at c or d with a hope to develop a moyo on the right side, White can again atari at e and descend at a to expose an open skirt, which erases the value of a moyo on the right.
If Black continues at e to build a wall in gote, again with the hope of develping a moyo on the right side, White has sente to play a splitting move, which means Black is unable to fulfill their plan.
Black's best option is to hane at a, which gives Black an excellent local result and works well in conjunction with the  approach stone. Since the ladder works for Black, there is even a possibility that Black might finish the joseki with sente.
When should Black hane and double hane?
When should Black double hane for sente?
When should Black make the hanging connection?
White Discussion
Atari up to deny Black follow-ups
When should White pincer?
See Also
References
- [1] Frequency statistics were obtained from
![[ext]](images/extlink.gif) Waltheri's Go Pattern Search using the full database restrained to a local search (accessed July 2022).
Waltheri's Go Pattern Search using the full database restrained to a local search (accessed July 2022).
- [3] (Youtube) Michael Redmond:
![[ext]](images/extlink.gif) AI Joseki #1 The Direct 3-3 Invasion variation 1
AI Joseki #1 The Direct 3-3 Invasion variation 1
- [3] (Youtube) Michael Redmond:
![[ext]](images/extlink.gif) AI Joseki #2 The Direct 3-3 Invasion variation 2
AI Joseki #2 The Direct 3-3 Invasion variation 2
- [4] (Youtube) Ji Lili:
![[ext]](images/extlink.gif) 星位 点三三(中集)
星位 点三三(中集)
![[Diagram]](diagrams/19/4d4efaeb315b23906f5bfeef87d36d64.png)
![[Diagram]](diagrams/13/ddf79e71f8fdbd2904446d021666046c.png)
![[Diagram]](diagrams/32/cd51cf170059d39a858ce9cfdffeca3f.png)
![[Diagram]](diagrams/12/0e27092a971cfcfbf4d1bc32f5f9f314.png)
![[Diagram]](diagrams/25/439f90d1785f85c9cce304ca3f89c98b.png)
![[Diagram]](diagrams/25/bc4c36c137576a9007d98c62323ad491.png)
![[Diagram]](diagrams/14/90d57122d4157fc202c67c29574b82f9.png)
![[Diagram]](diagrams/41/b58860aab480228a18f3b1d0f57d2695.png)
![[Diagram]](diagrams/4/b6a6cadfc3a765a7d3265c6a9fd12094.png)
![[Diagram]](diagrams/8/df48e160fb157758cf075970f1b796b5.png)
![[Diagram]](diagrams/8/87bb5e6590daf70896befd90f799671e.png)
![[Diagram]](diagrams/52/7666334c4d947f698eb23c524785b575.png)
![[Diagram]](diagrams/40/37da4082493ce320cf0dec1e43608d5b.png)
![[Diagram]](diagrams/15/67a0b12e78e89404787161c95035a921.png)
![[Diagram]](diagrams/26/963dc876c7881347a626e8450c71fbab.png)
![[Diagram]](diagrams/43/d2958349c0255d9a265845007916663c.png)
![[Diagram]](diagrams/29/a8f3dffcffb7743811e0f2c60ba16dcf.png)
![Sensei's Library [Welcome to Sensei's Library!]](images/stone-hello.png)