4-4 Point 3-3 Invasion, Extend, Small Knight
Return to parent joseki article: 4-4 point 3-3 invasion, extension
The 4-4 Point 3-3 Invasion, Extend, Slide (also known as the "Simple 3-3 Invasion Slide Joseki") is a basic and popular 3-3 invasion joseki. It is one of the simplest joseki, well-regarded by strong AI, and frequently used at all levels of amateur and professional play. In 2019 and 2021, it was the most popular joseki in professional games [2][3]. The position is stable and neither player has urgent follow-ups.
| Table of contents |
Quick Navigation
Moves are listed by frequency in professional games[1], which is sensitive to whole-board position. Bolded moves are commonly considered joseki.
- t, Simple 3-3 Joseki, Tenuki - (joseki) (common) (beginner) (AI favorite)
- a, Simple 3-3 Joseki, 5-space High Extension - (joseki) (common) (beginner)
- b, Simple 3-3 Joseki, 5-space Low Extension - (joseki) (common) (beginner)
- c, Simple 3-3 Joseki, Small Knight Press - (joseki) (common) (beginner)
- d, Simple 3-3 Joseki, Hane Below - (joseki) (common) (intermediate)
- f, Simple 3-3 Joseki, Attach - (joseki) (intermediate) (situational)
- e, Simple 3-3 Joseki, 4-space High Extension - (joseki) (beginner)
- g, Simple 3-3 Joseki, 4-space Low Extension - (joseki) (beginner)
- a, Simple 3-3 Joseki, Tenuki, Diagonal - (joseki) (common) (beginner) (AI favorite)
- b, Simple 3-3 Joseki, Tenuki, 3-space High Pincer - (joseki) (common) (intermediate)
- c, Simple 3-3 Joseki, Tenuki, 5-space Low Pincer - (intermediate)
- d, Simple 3-3 Joseki, Tenuki, 5-space High Pincer - (intermediate)
- e, Simple 3-3 Joseki, Tenuki, 3-space Low Pincer - (intermediate)
- f, Simple 3-3 Joseki, Tenuki, 4-space High Pincer - (intermediate)
- g, Simple 3-3 Joseki, Tenuki, 4-space Low Pincer - (intermediate)
- h, Simple 3-3 Joseki, Tenuki, Descend - (rare/situational)
Overview of Black Continuations
Tenuki
The most common choice by Black is to tenuki (~57%)[1]. This is consistent with the purpose of choosing this joseki, which is to take sente elsewhere on the board while creating a stable group.
Black's three stones are difficult to attack, so Black does not need to add more stones for the time being.
Make Extension
See article: Extension From a Wall
In modern go theory, extensions from thick and established walls should be aggressive and placed further than the conservative placement recommended by the traditional 'four-space extension from a three-stone-wall' go proverb.
In the following example, strong AI programs evaluate the marked letters as reasonable Black extensions from a popular 3-3 invasion[1]. Notably, the conservative four-space extension recommended by the go proverb (marked with a square) is a candidate move, but it is inferior compared to the other options, slightly overconcentrated, and not ideal for this board position.
Black's three-stone-wall is resilient and does not need a conservative extension in order to be comfortable. In case Black is pincered, Black can play at x or y to gain strength for their wall.
- Play away from thickness
- Don't use thickness to make territory
- (Blog - u/matagen)
![[ext]](images/extlink.gif) Choosing the Right Extension (2021)
Choosing the Right Extension (2021)
Kikashi (Gain Strength in Sente)
See main article: Simple 3-3 Invasion Slide Joseki, Attach
| Attach (~5%)[1] | Hanging Connection | ||
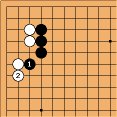 Attach/Extend (~3%)[1] | 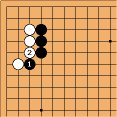 3-Stone Hane (~1%)[1] |  Attach/Hane (~1%)[1] | 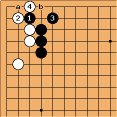 Scorpion Shape (<1%)[1] |
- Although it is rare to play this way on an empty board, Black's most common local continuation is the diagonal attachment. This is a defensive move that allows Black to build strength in sente, but it limits Black's future options and is generally inferior for development when compared to the knight's move press or hane. It is most common for black to attach when the three-stone wall is pincered and black needs to gain enough strength to counter-pincer or escape.
- In response to the diagonal attachment, it is most common for white to extend in order to deny Black further forcing moves that Black can use to develop thickness. However, it is also possible for white to prioritize the outside with the hane or firmly retain the inside territory by reverting to the three-stone hane shape in special circumstances.
- It is also possible for black to create the scorpion shape to defend themselves. Professionals usually do not play this way unless the prospects for escape are poor, as typically Black will want to move out before struggling to live inside. Often, White will want to take the atari with
 , because if Black plays the hane at a on the first line, Black can create an eye in sente. Black should then tenuki, as it is too slow for White to capture immediately. Later, Black can always play a ko at b for the eye.
Switch Sides
| Hane (~6%)[1] | ||||
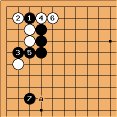 Switch Sides (~3%)[1] | 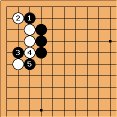 Transposition (~2%)[1] | 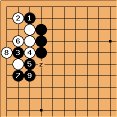 Resistance (~2%)[1] | 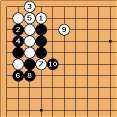 Worse for White (n/a)[1] | 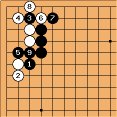 Worse for Black (n/a)[1] |
- Black can attempt to switch sides in gote with the hane at
 . Typically, it is best for White to atari with
  , allowing White access to the top side of the board. Most professionals feel that this joseki is better for White, but Cho Yeonwoo thinks it is good for Black.[4]
- It is also possible for White to resist Black's plan by cutting with
 (Dia 2), which transposes to a popular three-stone hane joseki. White may play this way if they wish to retain more of the corner territory or to start a fight by cutting at z, but Black has sealed White in on both sides (Dia 3). White typically does not want to play the side switching variation at this point (Dia 4) because this is clearly worse for White than an earlier option (Dia 1).
- It is also noteworthy to mention that Black can also choose to switch sides after the diagonal attachment with
 (Dia 5). However, this variation is better for White because White's two outside stones retain more vitality, and the aji is bad.
Press Down
The small knight press is often black's strongest local move in terms of development, making it more preferable than the diagonal attachment on an empty board. However, it is not especially popular among professionals, as this move can be gote, and White does not need to respond. Furthermore, Black can only play this way if they are not afraid of the potential cut.
For example, if Black tries to push White down with  , White resists with
  and cuts at
  before living in the corner.
It should be noted that black's three-stone wall is not very well suited for further development. The simple 3-3 invasion slide joseki is a defensive formation, and Black often plays this way with the intent to tenuki. If Black hopes to develop the left side or obtain a wall, the three-stone hane shape is more effective for this purpose. The small knight press could be less popular among human professionals because it is simply better to choose a joseki that is more consistent with the player's future plans. However, the small knight press is often considered a good move by strong AI programs.
Overview of White Continuations
Strengthen Side
| Diagonal | |
White's strongest local continuation is the diagonal at  . It is a steady, calm yet big move that threatens a follow-up pincer around a, but generally speaking it is gote. This move helps White develop strength and potential towards the left side of the board. White may be able to attack Black's wall later.
In response to the diagonal, Black can attach at y or hane at z, but the effectiveness of these moves are much weaker compared to before.
The most common continuation is depicted in Diagram 2. Note that White cannot atari at g, since Black's connection will allow Black to hane at i to take most of the corner territory.
Pincer
It is also possible for White to pincer without playing the diagonal. However, the pincer is less effective since Black can attach at z to gain strength in sente.
Nonetheless, the three-space pincer around b is considered the vital point of Black's three-stone wall.
The pincer at  is more of a splitting move, where White hopes to make a base on the upper side of the board.
The high pincers at b or d are often played to disrupt a potential Black framework.
The low three-space pincer at c is often played when White has a position on the upper right side and serves as an aggressive extension.
Discussion
When playing wall extensions, the best moves achieve two things with one stone
yuzukitea: The modern AI-style of play seems to be to omit an extension from three-stone wall unless it is achieving two things with one stone. If you can think of two reasons to play an extension, then it can be a good move. For instance, if the move...
- Creates an extension from the three-stone wall
- Serves as an extension or base from a second wall (or weak group)
- Approaches another corner
- Pincers or counter-approaches a stone (or weak group)
- Prevents your opponent from getting an extension/base from a wall
If any two (2) of the above are true, then it can be reasonable to play an extension from the three-stone wall.
When is it best for Black to play the diagonal attachment?
The classic situation to play the diagonal attachment is when the three-stone wall comes under pressure. It is used as kikashi to build thickness or escape towards the center.
In Mi Yuting vs. Yang Dingxin (2019), Black followed up from an earlier extension and played the two-space high pincer with  . Notably, Black has not yet played the diagonal at z, which would make the attack even more severe.
How should White respond? Why?
The attach at a is a probe that may give White more options depending on Black's response. In some situations, White may even be able to obtain to the hane at b for free. Regardless of Black's response, White should move towards the center in order to avoid being sealed in.
Some players may be tempted to make the scorpion shape with the hane at b. However, in this board position, we can see that the  marked stone would an obstacle if White attempted to undercut the bottom side. While there still may be enough space for White to make life in gote (or ko), White does not want to live in gote except as a last resort. For this reason, White should move out since the front door is still open.
If the situation becomes difficult, White can also take the hane at b later. In fact, it is more common to see the scorpion shape when Black already has a move at the diagonal at z.
When is it best for Black to switch sides?
On an empty board, many professional players feel that the joseki to switch sides is better for the invader. However, in certain board positions, it can be an especially good move.
An example is illustrated in Yang Dingxin vs. Ke Jie (2019), where we can se that Black played the hane with  followed by the
  cut, aiming to switch sides. If the normal joseki is played out with
  at a, we can see that this would clearly favor Black, as Black has more potential to the upper side of the board than the right side. White has a strong group on the right side of the board, so it is no longer very interesting.
In the game, White (Ke Jie) is unwilling to accept this outcome. Instead of playing peacefully at a, White attempts to resist by reverting to a three-stone hane joseki at b with  , followed by the violent cut at z on
  . By doing so, White starts a fight instead of allowing Black to switch sides comfortably.
When is it best for Black to press down?
The small knight press is an especially effective move when White has potential on two sides of the board. Although the move is gote, it is an effective way for White to develop an advantageous whole-board position.
This principle is illustrated in Fan Yunruo vs. Dang Yifei (2019), where we can see that White is developing a menacing moyo on the top side. The press at  expands the moyo, and it activates White's potential to develop the right side.
Black chose to tenuki in response to  and invaded White's moyo on the upper side, but White was able to attack Black's invasion and later descend at a to turn the left side of the board into a second large moyo. By the end of the game, the left side of the board was White's largest territory.
We can compare the merits of the knight's move  to the diagonal attachment at x. Although attaching at x will allow White to retain sente, this form of contact play is crude and helps Black retain access to the left side. White may think that they will be able to convert the moyo on the upper side of the board into territory, but White cannot secure the entire moyo in one move, and White has essentially put all their eggs in one basket.
While it may seem counter-intuitive, strong players use influence to attack, not make territory. White hopes that Black will invade the moyo (and in fact invites it). White's plan is to profit elsewhere while attacking a weak group, and the small knight's move at  is a subtle move that activates White's future potential in multiple directions.
When does it make sense to make the scorpion shape?
In most circumstances, it is better for White to escape by attaching at z instead of attempting to live small inside. The hane and hanging connection with  -
- is a strategy that White can employ as a last resort when it seems like there is no way good way out.
However, there are exceptions to this general principle, and Han Taehee vs. Park Minkyu (2018) illustrates an example where the hanging connection with  is an especially good move.
In this board position,  threatens to link up with
  marked stone. Alternatively, if Black prevents the connection and White is able to play at a, White's group is nearly alive, which leaves Black will a difficult decision. These two moves are miai, which illustrates the ideal circumstance to utilize the scorpion shape when White has an opening to undercut a Black stone on the second line.
Why don't we play two-space high pincers?
Strong AI programs typically regard the 3-space pincer or 3-space extension at a as the vital point of the three-stone wall. What happens if White plays one stone closer to the wall?
In the accompanying diagram, we see that White has already obtained the valuable diagonal with the marked  stone, which sets up an aggressive attack. Instead of playing the ordinary 3-space pincer, White overplays and pincers at
  . Black has several options they can consider.
First, Black can attach at z to develop more strength and then counter-pincer.
Alternatively, Black can make the scorpion shape and undercut White's stone with  , and Black will have no difficulty handling their group.
References
- [1] Frequency statistics were obtained from
![[ext]](images/extlink.gif) Waltheri's Go Pattern Search using the full database restrained to a local search (accessed July 2022).
Waltheri's Go Pattern Search using the full database restrained to a local search (accessed July 2022).
- [2] (OGS Forums)
![[ext]](images/extlink.gif) The Twenty Most Popular Current (2019) Joseki (Nov 2021)
The Twenty Most Popular Current (2019) Joseki (Nov 2021)
- [3] (OGS Forums)
![[ext]](images/extlink.gif) Most Popular Joseki in 2021
Most Popular Joseki in 2021
- [4] (Youtube) (Cho Yeonwoo)
![[ext]](images/extlink.gif) Let's conquer 3-3 invasion! Alphago's the biggest present for humans Gopro Yeonwoo (2019)
Let's conquer 3-3 invasion! Alphago's the biggest present for humans Gopro Yeonwoo (2019)
- [5] (Youtube) Michael Redmond:
![[ext]](images/extlink.gif) Learn Redmond's AI Style Go in 5 minutes - ALL About the Direct 3-3 (3) (2021)
Learn Redmond's AI Style Go in 5 minutes - ALL About the Direct 3-3 (3) (2021)
- [6] (Youtube) Michael Redmond:
![[ext]](images/extlink.gif) Learn Redmond's AI Style Go in 5 minutes - ALL About the Direct 3-3 (4) (2021)
Learn Redmond's AI Style Go in 5 minutes - ALL About the Direct 3-3 (4) (2021)
![[Diagram]](diagrams/31/3933e00e17aa8b7c5e958fa1907528fe.png)
![[Diagram]](diagrams/48/82eb0f6ca9cc0b7efcc88d637e796c46.png)
![[Diagram]](diagrams/45/eb4269052f6db51efb9cf1d23834671e.png)
![[Diagram]](diagrams/49/dceced90e1cc757d99181d934c3d826a.png)
![[Diagram]](diagrams/32/8ad4ad52f39c23e1bd3dbdff6eac51b2.png)
![[Diagram]](diagrams/26/54a97618225a01ce9f69fa5f72f9bb54.png)
![[Diagram]](diagrams/11/2a8980e543c0c31f4e2ee95045c6e31f.png)
![[Diagram]](diagrams/51/537c877a932035b5e280ada71fcf7eab.png)
![[Diagram]](diagrams/47/a03e225786c654f8603dded7f5bc77b6.png)
![[Diagram]](diagrams/16/3403ffd7a03da841408bc87618295936.png)
![[Diagram]](diagrams/27/c02855f84dbacd3327f1600b6f9b0269.png)
![[Diagram]](diagrams/35/9ab9440516c1feea5cd6cad467258263.png)
![Sensei's Library [Welcome to Sensei's Library!]](images/stone-hello.png)