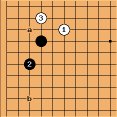
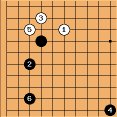
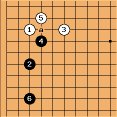
4-4 Point Low Approach Low Extension, Slide
Return to parent joseki article: 4-4 point low approach low extension
The 4-4 Point Low Approach, Small Knight Extension, Slide is the traditional joseki that occurs after the low approach. The purpose of the slide is to ask for the corner, and the defender may choose to defend their territory or take the outside. Tenuki is also possible.
It has fallen in popularity since the AI Revolution, but it is still a recommended joseki for beginners due to its simplicity.
| Table of contents |
Quick Navigation
Moves are listed by frequency in professional games[1], which is sensitive to whole-board position. Bolded moves are commonly considered joseki.
- a, 4-4 Point Low Approach Small Knight Extension, Slide, 3-3 - (joseki) (common) (beginner)
- b, 4-4 Point Low Approach Small Knight Extension, Slide, Tenuki - (joseki) (common) (intermediate) (AI favorite)
- c, 4-4 Point Low Approach Small Knight Extension, Slide, One-Space Pincer - (joseki) (intermediate)
- d, 4-4 Point Low Approach Small Knight Extension, Slide, Outside Attachment - (joseki) (advanced)
- e, 4-4 Point Low Approach Small Knight Extension, Slide, Two-Space Low Extension
- f, 4-4 Point Low Approach Small Knight Extension, Slide, Inside Attachment - (mistake)
Overview of 4-4 Point Slide Joseki
Corner Defense
See main article: 4-4 point low approach low extension, slide, 3-3
Defending the corner by playing  at the 3-3 point is traditionally the most common response to the slide (~47%)[1]. The corner defense emphasizes territory and establishes a strong base for Black, which is recommended for beginners in most situations.
The 3-3 point is the vital point of many corner joseki and life and death shapes. Often times, the first player who occupies it will have an easier time making life, and their local position will be stronger than their opponent. The slide joseki follows this common pattern, and it is sensible for Black to take it.
Defending the corner is typically better than taking the outside because corner territory is efficient. The "corners, then sides, then center" go proverb has been been recommended by go teachers for thousands of years, because it takes very few stones to secure a sizable amount of territory in the corner.
Black  secures ~8 points of solid territory of Black (squares). Black has a valuable double sente endgame push at b (~4 points of territory or ~8 points of value) as well as potential to expand somewhere along the side (c).
Most importantly, Black is a strong group and resilient. Black can safely tenuki several White moves against this group without worrying for safety. Strong groups will allow Black to effectively attack other groups in this area of the board, which is a central aspect of the middlegame. If White omits another move for their two stones and leaves them as a weak group, Black can pincer White very effectively around ''d''.
Tenuki
|
Other Responses | ||
 Tenuki |  Tenuki, 3-3 |  Tewari Analysis |
For advanced players, Black can consider tenuki after the slide and take sente. This is slightly recommended by strong AI programs, as  slide is not strictly speaking a forcing move. Black can treat either a or b as miai (Dia 1).
For amateur players, it is generally recommended to defend the corner at a. Black will nearly always keep sente when they play at the 3-3 point, so amateurs can comfortably take a highly valuable position in sente early on rather than misjudging the board later in the game.
The 3-3 point is double sente and very big, worth ~10 points in territory (~20 points in value). Opting to tenuki versus playing locally is a very precise calculation in value, and players should have a strong grasp of modern opening theory (see: Leela Zero's opening gospel). Unless the player is sure that their opening is nearly perfect (by professional and AI standards), the tenuki probably is not advisable for beginners. One simplistic way to understand it is as follows:
- Responding to the slide the 3-3 point is almost never a mistake.
- Each tenuki from this position could be a mistake.
One reason why AI programs might believe tenuki is okay for Black can be revealed by tewari analysis. If the order of the stones are re-arranged (Dia 3),  is slightly misplaced in response to
  . As a result, in AI self-play games, neither players feel an urgent need to take the 3-3 point. In fact, the AI will often leave the position unsettled until something interesting occurs in the vicinity.
Outside Plays
|
Outside Plays | |
 One-Space Pincer (~15%)[1] |  Outside Attachment (~9%)[1] |
In professional games, it is also common for Black to play for the outside rather than defending the corner. These are typically considered situational joseki, although it is playable in the opening even on an empty board.
- The one-space pincer emphasizes influence, either on the left side or top side. It is best played when Black has the ladder, although a similar weaker version is possible without the ladder.
- The outside attachment is typically played when Black wishes to develop a position on both sides. However, Black will often be weak as a result.
The one-space pincer is commonly seen in professional games when Black has a corner enclosure that projects influence over the top side of the board (black circles), often in a formation that resembles the orthodox fuseki.
In AlphaGo Master (B) vs. Cho Han-seung (W) (2017), Master (Black) played an orthodox-style fuseki with a large knight enclosure.
When Cho Han-seung (White) approached at  , Black responded once at
  , then tenuki'd in response to the slide and approached the bottom right 4-4 Point with
  , which prevents White from playing an enclosure in the future as a ladder breaker. This allowed Black to comfortably pincer at
  with the knowledge that White had no compelling ladder breakers along the path.
When the pincer joseki is played out with White continuing at a, Black will invest a move to ensure that the ladder is no longer a threat by playing a stone to catch the ladder at the marked square. All of these stones work together to give AlphaGo Master a powerful moyo and influence along the top side of the board even though White obtained the 3-3 point in the upper left corner.
It should be noted that White has an option to resist Black's plan by jumping at b instead of taking the corner with a. This pattern would revert to a joseki that resembles the 4-4 Point Low Approach One-Space Low Pincer. However, in this variation, Black would keep the corner and gain territory on both sides.
The  outside attachment is a more aggressive move that is seen in professional play when White wishes to develop a position on both sides. However, the contact play will typically leave at least one of White's sides weak.
Kim Junghyun (B) vs. Lee Sedol (W) (2016) is a good example of the outside attachment in professional play. In this game, Lee Sedol (White) already had a stone on the top side of the board (white circle) and it is weak. Playing the traditional slide joseki (red squares) would likely damage White's lonely stone further, as black's natural extension serves as a pincer.
To avoid this outcome, White plays the outside attachment with the goal of assisting White's existing stone. On an isolated board,  may be weak and pressured by Black's follow-ups, but having a friendly stone to run to makes this choice of joseki sensible.
Discussion
[1] DaveSigaty: I was interested in whether the slide is really the most frequent continuation against the small knight. It is the most frequent according to GoGoD CD, appearing about 40% of the time. Having said that, the most frequent strategy for White after the small knight extension is to tenuki with her next move. This is a little more frequent than the immediate slide. Once White plays tenuki, Black and White are about equally likely to play next in this area. Black has played conservatively with the small knight extension and White's original small knight approach is a resourceful stone so this may not be the most urgent part of the board. A significant portion of the final shapes, including the slide, occur after White or Black come back to this corner.
Charles Matthews Yes, I think the swing in opinion about the diagonal attachment attack (not just my prejudice, since Guo Juan talks about this) has led to a substantial use of 'kakari kikashi' by pros in recent years. That is, White plays the approach in the first diagram in order to get an answer (rather expecting the keima); and then treats this as a kikashi or probe. Anyway, such seems to have been the fashion.
Bill: Historically, I think that the large low extension has been the most common in high level play. In premodern times the low extension was considered too conservative, while the high extension was not territory oriented. It was GoSeigen who first argued for the low extension.
He pointed out that, with the marked stones on the board, this is an even position. Then  is a good move.
Charles In a sense, don't you need to argue more: that  here isn't any more ideal?
That anyway would make the Go Seigen reasoning more interesting, in line with some of his other iconoclastic ideas. Making this large low enclosure looks good by classical, territorial standards.
Bill: Well, the 3-3 is even more territorial, having fewer weaknesses than the large low enclosure. It does seem a bit low, however.
Myself, I do not see a clear preference for any of these plays.
Resources
- (Youtube) BenKyo Tutoring (5d):
![[ext]](images/extlink.gif) Approach & Slide - Joseki Learning Path, Beginner to 1-Dan! (+ Pro Game Commentary!) (2021)
Approach & Slide - Joseki Learning Path, Beginner to 1-Dan! (+ Pro Game Commentary!) (2021)
References
- [1] Frequency statistics were obtained from
![[ext]](images/extlink.gif) Waltheri's Go Pattern Search using the full database restrained to a local search (accessed August 2021).
Waltheri's Go Pattern Search using the full database restrained to a local search (accessed August 2021).
![[Diagram]](diagrams/45/06ed945e81a46e44952395fdf18ce4ba.png)
![[Diagram]](diagrams/15/f5c93699b4e0c0ef229c0eaebafab832.png)
![[Diagram]](diagrams/22/7d61b98d3f5fff339359827c8cc4eccd.png)
![[Diagram]](diagrams/43/65755aca2896cfb82fb1e1ccffad522b.png)
![[Diagram]](diagrams/4/58eda6c390c3e4afeaf05f2f69eb9ca2.png)
![[Diagram]](diagrams/25/af8ca71faf0d5d543dd2f6b4260ab3e5.png)
![[Diagram]](diagrams/47/db4ec5a324eac74a3ac96568bdd872d7.png)
![Sensei's Library [Welcome to Sensei's Library!]](images/stone-hello.png)