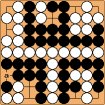
Unremovable Ko
An unremovable ko is a ko that one player can start at any time, while the other player can do nothing to remove that option.
Examples:
In this position, white has an unremovable throw-in ko. White can, at any time, play b to start a ko for the corner. Black can do nothing to remove this ko.
It is not an unremovable ko the other way around. Although black can start the ko at any time by playing a, white can remove the ko by playing a himself, creating seki.
Black cannot remove this ko by filling, as he will die. On the other hand, White can take and fill the ko for seki.
These two positions are well known. See Sending three, returning one.
Implications for play
These positions are hyperactive. How to play them depends upon the ko threat situation. Often play revolves around creating and destroying ko threats.
When neither player is komaster, usually the player with fewer stones at stake (White in these examples), should start the ko. Even if he loses the ko, he will get compensation elsewhere in the ko exchange. The same is usually the case when Black is komaster. (The fact that Black cannot remove the ko is no disadvantage to Black then.)
When White is komaster, however, Black is at a serious disadvantage, because he has no effective play to remove the ko. The longer he waits to start the ko, the less he gets in compensation for losing it. Therefore, as paradoxical as it may seem, Black should usually start the ko as soon as possible.
Group status implications
If an unremovable ko remains at the end of the game, it may have implications for the status of groups (depending on the rule set):
Black claims: They are dead.
White says: Show me.
Play goes as shown. After  , white can live with a move at
  , or retake the ko with a move at
  .
.
Since the ko is bigger in this position, black takes with  at a and white lives with
  at
at  .
.
So what is the status of the white stones in the upper right?
Bill: The White stones are dead by Japanese rules, and also by Korean rules, I believe. By area scoring, optimal play is as given. By Lasker-Maas or Spight rules (territory rules), the given play is properly done in the encore.
Erik?: Japanese rules state: 'Stones are said to be alive if they cannot be captured by the opponent, or if capturing them would enable a new stone to be played that the opponent could not capture.' The latter seems to be relevant here.
Bill: If Japanese hypothetical play goes as above, Black kills the White stones with  and White cannot take the ko back, because White has not passed for it.
Herman: Thank you, Bill. Which leads me to the following question:
In this situation, is optimal play by black to claim seki?
Bill: I think that (under area rules or certain territory rules) Black scores 1 pt. better by "killing" the right side group in exchange for the ko.
Play could stop at this point by agreement that the White stones on the right are dead, and the score would be 25 - 24 in favor of Black. Or White could make Black capture those stones, for the same net score. If Black does not play in the encore the result is jigo.
Erik: I discovered the position when I was analyzing solutions for 4×6 Go. Here's the original position:
BTW I'm curious if this was already a know rules-beast, or if I was actually the first to stumble upon it.
Herman: I had never seen it before, and I've seen a lot of rules beasts already, so I wouldn't be surprised if this is a new discovery.
Bill: It's new to me. :)
Herman: I found a similar position at: ![[ext]](images/extlink.gif) http://www.harryfearnley.com/go/bestiary/molasses_ko.html (third diagram)
http://www.harryfearnley.com/go/bestiary/molasses_ko.html (third diagram)
Herman: I tried to build a position like this (because you told me you'd found it on 4x6), but failed. In the given positions, after  and
and  , black would capture with
  at a. So white should play
  at a, resulting in the following:
![[Diagram]](diagrams/33/02899b822edb999b847341e0547f7210.png)
![[Diagram]](diagrams/9/37b9e5b602e3da5e76eb8a57d801550e.png)
![[Diagram]](diagrams/33/fe27d07a7160ce0b1192c953c0f96ca5.png)
![[Diagram]](diagrams/19/f274c4cd373ebfa87b67be2792329859.png)
![[Diagram]](diagrams/49/9b4c8777af50eea35f9703556d7b8d1e.png)
 stones?
![[Diagram]](diagrams/43/4ad3118a5353ad8949d62b897192a7c9.png)
![[Diagram]](diagrams/41/1f22dd9270c28134c55ea1ced053b796.png)
![[Diagram]](diagrams/38/6464f62190eb4f34648603dd858ebb74.png)
![[Diagram]](diagrams/48/308e52d3434deec293d7c4eccc3041a1.png)
![[Diagram]](diagrams/36/09e30dc9b09344a52bf33f459ede3179.png)
![[Diagram]](diagrams/37/7a5e689a842ccb7820d0ff7aee74738d.png)
![[Diagram]](diagrams/23/d8f00ce55d2ec1640c176cae71b436c8.png)
![[Diagram]](diagrams/5/dcbaa98828776cda3d3f794b67026fb6.png)

![Sensei's Library [Welcome to Sensei's Library!]](images/stone-hello.png)