3-4 point low approach
Return to parent article: 3-4 point Josekis
The 3-4 Point Low Approach is a common approach of the 3-4 point. Joseki surrounding this position have been researched for over 400 years in Japan. Historically, it has been regarded as the most effective approach move, and Ishida Yoshio calls it a "treasure-house of joseki" due to its large number of variations[2]. The key ideas of the low approach are:
- The low approach aims for for tight, territorial play.
- The low approach typically does not settle quickly. A second play is required to finish the corner, which can often leave the status of the corner unresolved.
- The low approach is usually not as effective for attacking or developing influence. Historically, it was common to pincer the low approach.
Black's main responses to the low approach can be classified into: (A) strengthen the side, (B) tenuki, (C) kick, or (D) pincer.
| Table of contents |
Quick Navigation
Moves are listed by frequency in professional games[1], which is sensitive to whole-board position. Bolded moves are commonly considered joseki.
![[Diagram]](diagrams/20/b20f43899ddeb5c939bb74382e084b7c.png)
- b, 3-4 Point Low Approach Diagonal - (joseki) (AI favorite) (common) (beginner)
- f, 3-4 Point Low Approach Small Knight - (joseki) (AI favorite) (common) (beginner)
- i, 3-4 Point Low Approach Kick - (joseki) (AI favorite) (common) (beginner)
- t, 3-4 Point Low Approach Tenuki - (joseki) (common) (intermediate)
- g, 3-4 Point Low Approach One-Space Low Pincer - (joseki) (intermediate)
- d, 3-4 Point Low Approach One-Space High Pincer - (joseki) (advanced)
- a, 3-4 Point Low Approach Two-Space High Pincer - (joseki) (advanced)
- h, 3-4 Point Low Approach Two-Space Low Pincer - (joseki) (advanced)
- c, 3-4 Point Low Approach Three-Space Low Pincer - (joseki) (intermediate)
- e, 3-4 Point Low Approach Three-Space High Pincer - (joseki) (intermediate)
- j, 3-4 Point Low Approach Two-Space Extension - (traditional) (rare)
- k, 3-4 Point Low Approach High Attachment - (traditional) (rare)
- l, 3-4 Point Low Approach Shoulder Hit - (trick play) (rare)
- z, 3-4 Point Low Approach Small Knight Cap - (mistake)
Overview of 3-4 Point Low Approach Joseki
Strengthen Side
|
Strengthen Side | ||
 Diagonal (~22%)[1] |  Small Knight (~7%)[1] |  Two-Space Ext. (~2%)[1] |
- The diagonal (Shusaku's Diagonal?) is the strongest local move for Black and applies the most pressure on White's stone. If White chooses to tenuki, the pincer at a is strong. It was extremely popular before komi, but fell out of fashion in the late twentieth century because it was believed to be "slow". However, it has come back into fashion ever since the AI revolution because strong AI programs evaluate it favorably.
- The small knight's extension is a faster alternative compared to the diagonal, but it has more weaknesses and the pincer follow-up is less effective. From the professional and AI perspective, both moves are good and comparable. Either one can be played interchangeably to suit the spacing and development of stones on the board.
- The two-space extension is a traditional joseki that is rarely played today.
Kick
 Low Extension (~1%)[1] |  High Extension (~1%)[1] |
- The kick is a move that emphasizes sente and corner territory. Historically, it was considered poor style for Black to play this way because it strengthens White and helps them establish a base (see: Don't Attach When Attacking). White will typically play
 somewhere around a-c. White is perceived to have benefited here because originally white's approach stone was weak and baseless, whereas black's stone on the 3-4 point is very resilient (it is essentially alive even if black choose to tenuki).
- Contrary to traditional dogma, strong AI evaluate the kick joseki more favorably. This is likely because Black retains sente whereas many of Black's other local responses are potentially gote.
- Black can play a low extension or a high extension with
 . The high extension has greater potential for development, but it has a weakness at z.
Tenuki
 Press (~3%)[1] |  Press, Slide (<1%)[1] |  Press, Push (~1%)[1] |
 Taisha Offer (~3%)[1] |  Standard Taisha (~1%)[1] |  Taisha Avoided (~1%)[1] |
- Historically, tenuki was the most common response to the 3-4 point low approach. The 3-4 stone is very resilient and difficult to attack, and it would be difficult for White to profit.
- The AI Revolution revealed that the 3-5 point press is a stronger move than previously believed, and strong AI programs often play it (or play a move to prevent it) as soon as possible (see: Leela Zero's Opening Gospel). AI-style fuseki put a high priority on unenclosed 3-4 points.
- It is worthwhile to note that tenuki has the potential to result in the taisha joseki, which is notoriously complicated. However, there are ways for Black to simplify at a slight loss.
Pincer
|
Pincer | ||||
 One-Space Low Pincer Press |  Two-Space High Pincer Press |  Two-Space Low Pincer Press |  Three-Space Low Pincer Press |  Three-Space High Pincer Press |
 Push and Cut Fight |  One-Space Low Press-Cut |  Two-Space High Press-Cut |  One-Space Low Press-Cut |  Three-Space Low Press-Cut |
 |  |  |  |  |
This section aims to describe common themes seen in 3-4 point low approach pincer joseki. Historically, pincering the low approach was extremely common. While pincers have declined in popularity since the AI revolution, they can result in very complex positions that focus on fighting. There are countless variations, but we aim to highlight common patterns and simplifications of various pincer joseki.
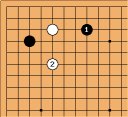
- In response to most pincer joseki (with the notable exception of the one-space high pincer), it is reasonable for White to press with
 at the 4-5 point. This is very similar to joseki surrounding the 3-5 point. In response to the press, Black's main options are either to (A) push along the side or (B) push and cut. The favorability of either option depends on the distance of the pincer stone.
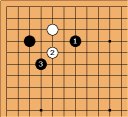
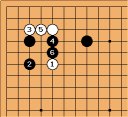
- In Dia 1 (one-space low pincer), the pincer stone
 is too close. It is easy for White to push along a to develop a wall, and then White can counter-pincer around z. The pincer stone is not doing much work, and instead it becomes a target. When the pincer stone is close to the main group, Black can make better use of the pincer stone by opting to push-and-cut instead. The regular push-and-cut fight is unfavorable for White (Dia 6), so it is simplest for White to compromise as depicted in Dia 7.
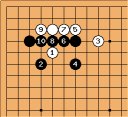
- The inverse is true when the pincer stone is far away. In Dia 10 (three-space low pincer), the push-and-cut fight is unfavorable for Black. This is because the pincer stone is too far away and not contributing much to the fight. When the pincer stone is far away, Black is more inclined to push along the side (Dia 4). It is also more difficult for White to counter-pincer when is further away.
- Historically, the most popular pincer was the two-space high pincer because the pincer stone is well-placed to support an ensuing fight. The joseki around this position are very difficult (Dia 8). For amateurs, a straightforward way to simplify the position is with the traditional two-space jump (Dia 12), which can result in the simplification depicted in Dia 15.
- It is not especially advisable for White to press in response to one-space high pincer. The one-space jump (Dia 11) is more common, and it can be simplified as depicted in Dia 14.
History
Discussion
Diagonal or knight's move?
![[Diagram]](diagrams/39/ce00727cb58db53c70e0babf7580a3bb.png)
Consider this board position. Where would you play as White?
There is no strict right or wrong answer and the AI believes either a, b, or c is playable.
Try to read a few moves ahead. In your opinion, which option is the best? Which option is the worst?
Should I tenuki?
Is it bad to kick?
Is it bad to pincer?
See also
References
- [1] Frequency statistics were obtained from ext Waltheri's Go Pattern Search using the full database restrained to a local search (accessed August 2022). Due to the weighting of older games in the database, the certain variations appear to be less frequent than it actually is in recent years.
- [2] Dictionary of Basic Joseki (1977) - Ishida Yoshio
![[Welcome to Sensei's Library!]](images/stone-hello.png "Sensei's Library")